 Các hàm xử lý chuỗi trong Javascript (cắt / tách / nối chuỗi ..)
  Chia lấy phần dư / chia lấy phần nguyên trong javascript
  Các sự kiện (Event) trong Javascript
  Các cách khai báo biến trong Javascript
 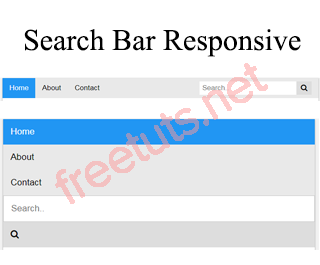 Hướng tạo thanh search bar bằng CSS
  Bắt sự kiện click trong Javascript
  Cách khai báo biến trong PHP, các loại biến thường gặp
  Download và cài đặt Vertrigo Server
  Thẻ li trong HTML
  Thẻ article trong HTML5
 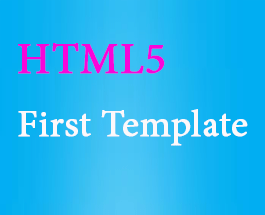 Cấu trúc HTML5: Cách tạo template HTML5 đầu tiên
  Cách dùng thẻ img trong HTML và các thuộc tính của img
  Thẻ a trong HTML và các thuộc tính của thẻ a thường dùng
 Tạo hiệu ứng portfolio zoom slider với jquery + zoom plugin + fancybox plugin
Trong bài này tôi sẽ hướng dẫn các bạn xây dựng một hiệu ứng slider rất đẹp dành cho các trang hiển thị danh sách sản phẩm hoặc danh sách tin tức có nhiều hình ảnh. Đây là một dạng hiển thị rất mới mà có lẽ ít bạn biết đến nên tôi hy vọng qua bài này sẽ giúp các bạn áp dụng nó vào project của mình. Để làm được hiệu ứng này ta phải sử dụng hai plugin jquery rất hay đó là zoom plugin và fancybox plugin.

Note: Nội dung bài này tôi tham khảo trên mạng và viết lại dưới sự hiểu biết của mình nhằm giúp những bạn không rành tiếng anh có thể tự xem được.
1. Tạo danh sách sản phẩm có slider
Chúng ta sẽ tạo trang danh sách sản phẩm và ở phần hình ảnh đại diện thay vì hiển thị một hình ảnh ta sẽ hiển thị một slider hình anh với các chức năng:
- Sử dụng Zoom plugin jquery để tạo hiệu ứng zoom
- Sử dụng fancybox plugin jquery để tạo hiệu ứng click vào sẽ hiển thị popup và hiệu ứng image slider
Bạn tạo trang index.html và điền nội dung mã HTML dưới đây vào thẻ body.
Bài viết này được đăng tại [free tuts .net]
<div class="wrapper">
<div id="content" class="content">
<div class="item">
<div class="thumb_wrapper">
<div class="thumb">
<ul>
<li><a rev="group1" rel="zoomHeight:200, zoomWidth:400, adjustX: 10, adjustY:-4, position:'body'" class='cloud-zoom' href="images/formstack1.jpg"><img src="images/thumbs/formstack1.jpg" alt="Formstack 1"/></a></li>
<li><a rev="group1" rel="zoomHeight:200, zoomWidth:400, adjustX: 10, adjustY:-4, position:'body'" class='cloud-zoom' href="images/formstack2.jpg"><img src="images/thumbs/formstack2.jpg" alt="Formstack 2"/></a></li>
<li><a rev="group1" rel="zoomHeight:200, zoomWidth:400, adjustX: 10, adjustY:-4, position:'body'" class='cloud-zoom' href="images/formstack3.jpg"><img src="images/thumbs/formstack3.jpg" alt="Formstack 3"/></a></li>
</ul>
</div>
<a class="prev" href="#"></a>
<a class="next" href="#"></a>
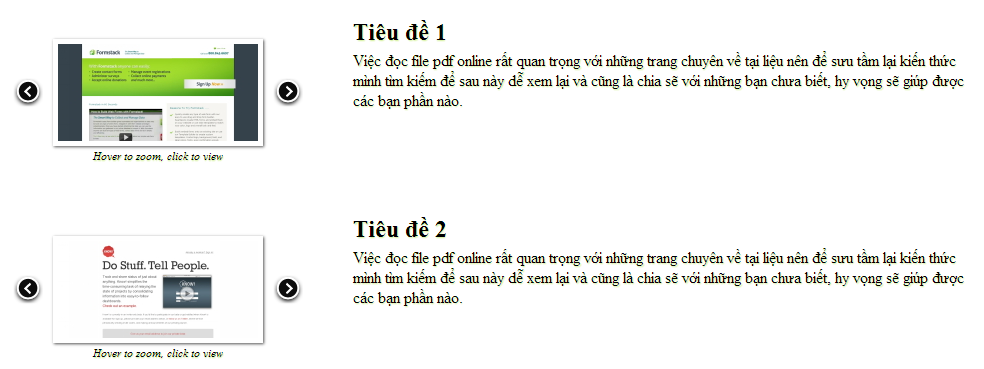
<span>Hover to zoom, click to view</span>
</div>
<div class="description">
<h2>Tiêu đề 1</h2>
<p>Việc đọc file pdf online rất quan trọng với những trang chuyên về tại liệu nên để sưu tầm lại kiến thức mình tìm kiếm để sau này dễ xem lại và cũng là chia sẽ với những bạn chưa biết, hy vọng sẽ giúp được các bạn phần nào.</p>
</div>
</div>
<div class="item">
<div class="thumb_wrapper">
<div class="thumb">
<ul>
<li><a rev="group2" rel="zoomHeight:200, zoomWidth:400, adjustX: 10, adjustY:-4, position:'body'" class='cloud-zoom' href="images/knowapp1.jpg"><img src="images/thumbs/knowapp1.jpg" alt="Knowapp 1"/></a></li>
<li><a rev="group2" rel="zoomHeight:200, zoomWidth:400, adjustX: 10, adjustY:-4, position:'body'" class='cloud-zoom' href="images/knowapp2.jpg"><img src="images/thumbs/knowapp2.jpg" alt="Knowapp 2"/></a></li>
<li><a rev="group2" rel="zoomHeight:200, zoomWidth:400, adjustX: 10, adjustY:-4, position:'body'" class='cloud-zoom' href="images/knowapp3.jpg"><img src="images/thumbs/knowapp3.jpg" alt="Knowapp 3"/></a></li>
</ul>
</div>
<a class="prev" href="#"></a>
<a class="next" href="#"></a>
<span>Hover to zoom, click to view</span>
</div>
<div class="description">
<h2>Tiêu đề 2</h2>
<p>Việc đọc file pdf online rất quan trọng với những trang chuyên về tại liệu nên để sưu tầm lại kiến thức mình tìm kiếm để sau này dễ xem lại và cũng là chia sẽ với những bạn chưa biết, hy vọng sẽ giúp được các bạn phần nào.</p>
</div>
</div>
</div>
</div>Ở đây bạn cần chú ý đến đoạn mã HTML sau:
<div class="thumb_wrapper">
                <div class="thumb">
                    <ul>
                        <li><a rev="group1" rel="zoomHeight:200, zoomWidth:400, adjustX: 10, adjustY:-4, position:'body'" class='cloud-zoom' href="images/formstack1.jpg"><img src="images/thumbs/formstack1.jpg" alt="Formstack 1"/></a></li>
                        <li><a rev="group1" rel="zoomHeight:200, zoomWidth:400, adjustX: 10, adjustY:-4, position:'body'" class='cloud-zoom' href="images/formstack2.jpg"><img src="images/thumbs/formstack2.jpg" alt="Formstack 2"/></a></li>
                        <li><a rev="group1" rel="zoomHeight:200, zoomWidth:400, adjustX: 10, adjustY:-4, position:'body'" class='cloud-zoom' href="images/formstack3.jpg"><img src="images/thumbs/formstack3.jpg" alt="Formstack 3"/></a></li>
                    </ul>
                </div>
                <a class="prev" href="#"></a>
                <a class="next" href="#"></a>
                <span>Hover to zoom, click to view</span>
            </div>
Trong đoạn mã HTML này có các thành phần như sau:
- Hai thẻ
<a class="prev" href="#"></a>và<a class="next" href="#"></a>dùng để hiển thị hai nút Prev và Next. - Bên trong thẻ div
<div class="thumb">sẽ là các hình ảnh, mỗi hình ảnh sẽ có các thông số cấu hình zoom image làzoomHeight:200, zoomWidth:400, adjustX: 10, adjustY:-4, position:'body'
2. Tạo CSS Style danh sách slider
Bây giờ ta sẽ tạo CSS để style cho trang web nhé, bạn sẽ thêm các đoạn CSS như sau:
*{
	margin:0;
	padding:0;
}
body{
	font-size:16px;
	color:#000;
	text-shadow:1px 1px 1px #D1EF95;
}
p.intro{
	font-weight:bold;
	font-style:italic;
}
a{
	color:#fff;
	text-shadow:1px 1px 1px #000;
	font-weight:bold;
	text-decoration:none;
}
a:hover{
	color:#000;
	text-shadow:none;

}
p{
	padding:5px 0px;
}
.wrapper{
	width:960px;
	margin:20px auto;
}
.item{
	float:left;
	width:100%;
	clear:both;
	margin:35px 0px;
}
.thumb_wrapper{
	width:290px;
	height:107px;
	position:relative;
	float:left;
	margin:20px 40px 0px 0px;
}
.thumb_wrapper a.prev,
.thumb_wrapper a.next{
	width:30px;
	height:30px;
	position:absolute;
	top:50%;
	margin-top:-15px;
	outline:none;
	cursor:pointer;
}
.thumb_wrapper a.prev{
	left:0px;
	background:transparent url(../images/fancy_nav_left.png) no-repeat top left;
}
.thumb_wrapper a.next{
	right:0px;
	background:transparent url(../images/fancy_nav_right.png) no-repeat top left;
}
.thumb_wrapper span{
	display:block;
	text-align:center;
	font-size:11px;
	font-style:italic;
	margin-top:3px;
}
.thumb{
	margin-left:40px;
	width:210px;
	height:107px;
	overflow:hidden;
	-moz-box-shadow:1px 1px 3px #555;
	-webkit-box-shadow:1px 1px 3px #555;
	box-shadow:1px 1px 3px #555;
}
.thumb ul{
	list-style:none;
	width:800px;
	height:107px;
}
.thumb ul li{
	float:left;
}
.thumb ul li a img{
	border:5px solid #fff;
}
.description{
	width:620px;
	float:right;
}
.clear{
	clear:both;
}
Chạy lên giao diện sẽ như hình dưới đây:
3. Thêm các file javascript cần thiết chạy slider
Bây giờ ta sẽ thêm các file css và javascript của các plugin nhé.
<!-- CSS -->
<link rel="stylesheet" type="text/css" href="css/style.css" />
<link rel="stylesheet" type="text/css" href="cloud-zoom/cloud-zoom.css" />
<link rel="stylesheet" type="text/css" href="fancybox/jquery.fancybox-1.3.4.css" />

<!-- PLUGIN JQUERY -->
<script type="text/javascript" src="http://code.jquery.com/jquery-1.4.4.min.js"></script>
<script type="text/javascript" src="fancybox/jquery.easing-1.3.pack.js"></script>
<script type="text/javascript" src="fancybox/jquery.fancybox-1.3.4.js"></script>
<script type="text/javascript" src="cloud-zoom/cloud-zoom.1.0.2.js"></script>
4. Viết mã Javascript xử lý slider
Đây là bước quan trọng nhất, bước này ta sẽ viết các đoạn mã javascript. Dưới đây là đoạn mã cuối cùng mà chúng ta cần:
$(function()
{
    // Tạo fancybox popup
    $("#content .cloud-zoom").fancybox({
        'transitionIn': 'elastic',
        'transitionOut': 'none',
        'speedIn': 600,
        'speedOut': 200,
        'overlayShow': true,
        'overlayColor': '#000',
        'cyclic': true,
        'easingIn': 'easeInOutExpo'
    });

    /*
     Bởi vì plugin zoom tạo thẻ bên trên hình nên
     muốn gán sự kiến click vào thẻ a thì ta phải
     gọi nó thông qua sự kiện click lên thẻ mà zoom tạo ra
     */
    $("#content .mousetrap").live('click', function() {
        $(this).prev().trigger('click');
    });

    // Div Wrapper
    var $content = $('#content');

    // Div list thumb
    var $thumb_list = $content.find('.thumb > ul');

    // Lặp qua từng thumb và xử lý
    $thumb_list.each(function()
    {
        // Các biến sử dụng
        var $this_list = $(this),
                total_w = 0,
                loaded = 0,
                $images = $this_list.find('img'),
                total_images = $images.length;

        // Lặp qua từng hình
        $images.each(function()
        {
            var $img = $(this);
            // Khi load hình sẽ xử lý thêm các plugin vào từng hình
            $('<img/>').load(function()
            {
                ++loaded;
                if (loaded == total_images)
                {
                    $this_list.data('current', 0).children().each(function() {
                        total_w += $(this).width();
                    });
                    $this_list.css('width', total_w + 'px');

                    //next / prev events
                    $this_list.parent().siblings('.next').bind('click', function(e)
                    {
                        var current = $this_list.data('current');
                        if (current == $this_list.children().length - 1)
                            return false;
                        var next = ++current,
                                ml = -next * $this_list.children(':first').width();

                        $this_list.data('current', next)
                                .stop()
                                .animate({
                            'marginLeft': ml + 'px'
                        }, 400);
                        e.preventDefault();
                    }).end().siblings('.prev').bind('click', function(e)
                    {
                        var current = $this_list.data('current');
                        if (current == 0)
                            return false;
                        var prev = --current,
                                ml = -prev * $this_list.children(':first').width();

                        $this_list.data('current', prev)
                                .stop()
                                .animate({
                            'marginLeft': ml + 'px'
                        }, 400);
                        e.preventDefault();
                    });
                }
            }).attr('src', $img.attr('src'));
        });
    });
});
Qua phần comment tôi đã giải thích được phần nào rồi, còn những dòng tiếp theo thật sự để giải thích nó thì hơi nan giải nên các bạn thông cảm nhé. Chỉ cần các bạn download source về và tự custom lấy rồi đưa vào source của mình thì sẽ thành công.
5. Lời kết
Đây là một chức năng khá hay trong các hiệu ứng slider mà các designers cần phải biết, chúc các bạn học tốt nhé