 Các hàm xử lý chuỗi trong Javascript (cắt / tách / nối chuỗi ..)
  Chia lấy phần dư / chia lấy phần nguyên trong javascript
  Các cách khai báo biến trong Javascript
  Các sự kiện (Event) trong Javascript
 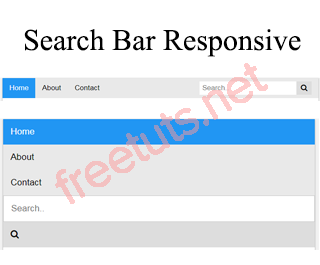 Hướng tạo thanh search bar bằng CSS
  Hàm array.slice() trong Javascript
  Tính tổng hai số bằng Javascript (cộng hai số)
  Cách khai báo biến trong PHP, các loại biến thường gặp
  Download và cài đặt Vertrigo Server
  Thẻ li trong HTML
  Thẻ article trong HTML5
 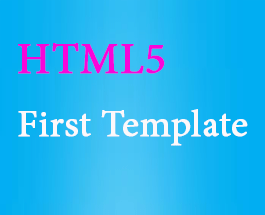 Cấu trúc HTML5: Cách tạo template HTML5 đầu tiên
  Cách dùng thẻ img trong HTML và các thuộc tính của img
  Thẻ a trong HTML và các thuộc tính của thẻ a thường dùng
 Notebook Slider với jQuery Booklet Plugin
Có một lần tôi lướt trên mạng và thấy một jquery plugin slider rất hay dùng để tạo hiệu ứng lật trang sách nên đã tìm hiểu, và cuối cùng cũng đã biết có một plugin giúp ta tạo hiệu ứng này với tên jquery booklet plugin. Đây là một plugin rất đẹp và cho ta custom dễ dàng theo giao diện website, với phần document của nó rất là dễ hiểu rồi nên trong bài này tôi chỉ làm mang tính chất giới thiệu và cách sử dụng những thông số trong plugin này, nếu bạn muốn tìm hiểu thêm thì có thể tham khảo link ở cuối bài này nhé.

Trong bày này tôi sẽ dựa vào một tuts có sẵn trên mạng và hướng dẫn lại cho các bạn để tôi khỏi mất thời gian viết, mục đích là sưu tầm lại kiến thức cho bản thân và nếu giúp được bạn nào thì tôi cũng thấy vui.
1. Xây dựng HTML cho notebook slider
Bạn cần tạo một trang HTML với nội dung HTML như sau:
Bài viết này được đăng tại [free tuts .net]
<div class="book_wrapper">
    <a id="next_page_button"></a>
    <a id="prev_page_button"></a>
    <div id="loading" class="loading">Loading pages...</div>
    <div id="mybook" style="display:none;">
        <div class="b-load">
            <div>
                <img src="images/1.jpg" alt=""/>
                <h1>Hình ảnh thứ nhất</h1>
                <p>Trong bài này chúng ta sẽ tìm hiểu plugin jquery booklet slider rất đẹp và áp dụng vào hệ thống của bạn,
                    Trong bài này chúng ta sẽ tìm hiểu plugin jquery booklet slider rất đẹp và áp dụng vào hệ thống của bạn,
                Trong bài này chúng ta sẽ tìm hiểu plugin jquery booklet slider rất đẹp và áp dụng vào hệ thống của bạn, </p>
                <a href="https://freetuts.net" target="_blank" class="article">Home</a>
                <a href="https://freetuts.net/notebook-slider-voi-jquery-booklet-147.html" target="_blank" class="demo">Chi Tiết</a>
            </div>
             <div>
                <img src="images/2.jpg" alt=""/>
                <h1>Hình ảnh thứ hai</h1>
                <p>Trong bài này chúng ta sẽ tìm hiểu plugin jquery booklet slider rất đẹp và áp dụng vào hệ thống của bạn,
                    Trong bài này chúng ta sẽ tìm hiểu plugin jquery booklet slider rất đẹp và áp dụng vào hệ thống của bạn,
                Trong bài này chúng ta sẽ tìm hiểu plugin jquery booklet slider rất đẹp và áp dụng vào hệ thống của bạn, </p>
                <a href="https://freetuts.net" target="_blank" class="article">Home</a>
                <a href="https://freetuts.net/notebook-slider-voi-jquery-booklet-147.html" target="_blank" class="demo">Chi Tiết</a>
            </div>
             <div>
                <img src="images/3.jpg" alt=""/>
                <h1>Hình ảnh thứ ba</h1>
                <p>Trong bài này chúng ta sẽ tìm hiểu plugin jquery booklet slider rất đẹp và áp dụng vào hệ thống của bạn,
                    Trong bài này chúng ta sẽ tìm hiểu plugin jquery booklet slider rất đẹp và áp dụng vào hệ thống của bạn,
                Trong bài này chúng ta sẽ tìm hiểu plugin jquery booklet slider rất đẹp và áp dụng vào hệ thống của bạn, </p>
                <a href="https://freetuts.net" target="_blank" class="article">Home</a>
                <a href="https://freetuts.net/notebook-slider-voi-jquery-booklet-147.html" target="_blank" class="demo">Chi Tiết</a>
            </div>
             <div>
                <img src="images/4.jpg" alt=""/>
                <h1>Hình ảnh thứ bốn</h1>
                <p>Trong bài này chúng ta sẽ tìm hiểu plugin jquery booklet slider rất đẹp và áp dụng vào hệ thống của bạn,
                    Trong bài này chúng ta sẽ tìm hiểu plugin jquery booklet slider rất đẹp và áp dụng vào hệ thống của bạn,
                Trong bài này chúng ta sẽ tìm hiểu plugin jquery booklet slider rất đẹp và áp dụng vào hệ thống của bạn, </p>
                <a href="https://freetuts.net" target="_blank" class="article">Home</a>
                <a href="https://freetuts.net/notebook-slider-voi-jquery-booklet-147.html" target="_blank" class="demo">Chi Tiết</a>
            </div>
        </div>
    </div>
</div>
2. Xây dựng CSS cho notebook slider
Bạn sẽ style cho slider cua ta như sau:
*{
	margin:0;
	padding:0;
}
body{
	background:#ccc url(../images/wood.jpg) repeat top left;
	font-family: Arial, Helvetica, sans-serif;
	color:#444;
	font-size:12px;
	color: #000;
}
h1{
	color:#2F1B0C;
	font-size:40px;
	margin:20px 0px 0px 20px;
}
span.reference{
	font-family:Arial;
	display:block;
	font-size:12px;
	text-align:center;
	margin-bottom:10px;
}
span.reference a{
	color:#000;
	text-transform:uppercase;
	text-decoration:none;
	margin:0px 20px;
}
span.reference a:hover{
	color:#ddd;
}
/* Booklet jQuery Plugin Style*/
.booklet{
	-moz-box-shadow:0px 0px 1px #fff;
	-webkit-box-shadow:0px 0px 1px #fff;
	box-shadow:0px 0px 1px #fff;
	-moz-border-radius:10px;
	-webkit-border-radius:10px;
	border-radius:10px;
}
.booklet .b-wrap-left  {
	background:#fff url(../images/left_bg.jpg) no-repeat top left;
	-webkit-border-top-left-radius: 10px;
	-webkit-border-bottom-left-radius: 10px;
	-moz-border-radius-topleft:10px;
	-moz-border-radius-bottomleft: 10px;
	border-top-left-radius: 10px;
	border-bottom-left-radius: 10px;
}
.booklet .b-wrap-right {
	background:#efefef url(../images/right_bg.jpg) no-repeat top left;
	-webkit-border-top-right-radius: 10px;
	-webkit-border-bottom-right-radius: 10px;
	-moz-border-radius-topright: 10px;
	-moz-border-radius-bottomright: 10px;
	border-top-right-radius: 10px;
	border-bottom-right-radius: 10px;
}
.booklet .b-counter {
	bottom:10px;
	position:absolute;
	display:block;
	width:90%;
	height:20px;
	border-top:1px solid #ddd;
	color:#222;
	text-align:center;
	font-size:12px;
	padding:5px 0 0;
	background:transparent;
	-moz-box-shadow:0px -1px 1px #fff;
	-webkit-box-shadow:0px -1px 1px #fff;
	box-shadow:0px -1px 1px #fff;
	opacity:0.8;
}
.book_wrapper{
	margin:0 auto;
	padding-top:50px;
	width:905px;
	height:540px;
	position:relative;
	background:transparent url(../images/bg.png) no-repeat 9px 27px;
}
.book_wrapper h1{
	color:#13386a;
	margin:5px 5px 5px 15px;
	font-size:26px;
	background:transparent url(../images/h1.png) no-repeat bottom left;
	padding-bottom:7px;
}
.book_wrapper p{
	font-size:16px;
	margin:5px 5px 5px 15px;
}
.book_wrapper a.article,
.book_wrapper a.demo{
	background:transparent url(../images/circle.png) no-repeat 50% 0px;
	display:block;
	width:95px;
	height:41px;
	text-decoration:none;
	outline:none;
	font-size:16px;
	color:#555;
	float:left;
	line-height:41px;
	padding-left:47px;
}
.book_wrapper a.demo{
	margin-left:50px;
}
.book_wrapper a.article:hover,
.book_wrapper a.demo:hover{
	background-position:50% -41px;
	color:#13386a;
}
.book_wrapper img{
	margin:10px 0px 5px 35px;
	width:300px;
	padding:4px;
	border:1px solid #ddd;
	-moz-box-shadow:1px 1px 1px #fff;
	-webkit-box-shadow:1px 1px 1px #fff;
	box-shadow:1px 1px 1px #fff;
}
.booklet .b-wrap-right img{
	border:1px solid #E6E3C2;
}
a#next_page_button,
a#prev_page_button{
	display:none;
	position:absolute;
	width:41px;
	height:40px;
	cursor:pointer;
	margin-top:-20px;
	top:50%;
	background:transparent url(../images/buttons.png) no-repeat 0px -40px;
}
a#prev_page_button{
	left:-30px;
}
a#next_page_button{
	right:-30px;
	background-position:-41px -40px;
}
a#next_page_button:hover{
	background-position:-41px 0px;
}
a#prev_page_button:hover{
	background-position:0px 0px;
}
.loading{
	width:160px;
	height:56px;
	position: absolute;
	top:50%;
	margin-top:-28px;
	right:135px;
	line-height:56px;
	color:#fff;
	padding-left:60px;
	font-size:15px;
	background: #000 url(../images/ajax-loader.gif) no-repeat 10px 50%;
	opacity: 0.7;
	z-index:9999;
	-moz-border-radius:20px;
	-webkit-border-radius:20px;
	border-radius:20px;
	filter:progid:DXImageTransform.Microsoft.Alpha(opacity=70);
}
3. Thêm các thư viện jquery booklet và easing
Bạn cần phải thêm 3 file gồm jquery, plugin booklet, plugin easing và 2 file fie css như sau:
<script type="text/javascript" src="http://code.jquery.com/jquery-1.4.4.min.js"></script>
<script src="booklet/jquery.easing.1.3.js" type="text/javascript"></script>
<script src="booklet/jquery.booklet.1.1.0.min.js" type="text/javascript"></script>

<link href="booklet/jquery.booklet.1.1.0.css" type="text/css" rel="stylesheet" media="screen" />
<link rel="stylesheet" href="css/style.css" type="text/css" media="screen"/>
4. Sử dụng plugin booklet để tạo notebook slider
Ở đây ta sẽ viết js để xử lý cho từng hình ảnh. Bạn thêm thẻ script và copy nội dung dưới đây vào.
$(function()
{
    // ID Slide Wrapper
    var $mybook = $('#mybook');

    // ID Button Next
    var $bttn_next = $('#next_page_button');

    // ID Button Prev
    var $bttn_prev = $('#prev_page_button');

    // ID Loadding (sẽ hiển thị khi slide chưa chạy để người dùng thấy đang chờ)
    var $loading = $('#loading');

    // Danh sách các hình ảnh slide
    var $mybook_images = $mybook.find('img');

    // Tổng số hình ảnh slide
    var cnt_images = $mybook_images.length;

    // Biến kiểm tra slide đã load hay chưa
    var loaded = 0;

    // Lặp qua từng hình ảnh và gán booklet vào
    $mybook_images.each(function()
    {
        // Gán hình đang duyệt vào biến $img
        var $img = $(this);

        // Lấy SRC của hình đang lặp
        var source = $img.attr('src');

        // Ở sự kiện load của hình ta sẽ gọi booklet
        $('<img/>').load(function()
        {
            ++loaded;
            if (loaded == cnt_images)
            {
                $loading.hide();
                $bttn_next.show();
                $bttn_prev.show();
                $mybook.show().booklet(
                {
                    name: '', // Title của hình, title sẽ hiển thị ở the title
                    width: 800, // Chiều rộng slide
                    height: 500, // Chiều cao slide
                    speed: 600, // Tốc độ lật trang
                    direction: 'LTR', // Lật kiểu Left To Right
                    startingPage: 0, // Trang muốn chạy đầu tiên
                    easing: 'easeInOutQuad', // phương thức ease sẽ gọi khi lật trang xong
                    easeIn: 'easeInQuad', // phương thức ease sẽ gọi khi lật trang đầu
                    easeOut: 'easeOutQuad', // phương thức ease sẽ gọi khi lật trang hai

                    closed: false, // Bật/tắt hiển thị bìa trắng đầu và cuối
                    closedFrontTitle: null, // used with "closed", "menu" and "pageSelector", determines title of blank starting page
                    closedFrontChapter: null, // used with "closed", "menu" and "chapterSelector", determines chapter name of blank starting page
                    closedBackTitle: null, // used with "closed", "menu" and "pageSelector", determines chapter name of blank ending page
                    closedBackChapter: null, // used with "closed", "menu" and "chapterSelector", determines chapter name of blank ending page
                    covers: false, // used with  "closed", makes first and last pages into covers, without page numbers (if enabled)

                    pagePadding: 10, // padding từng trang
                    pageNumbers: true, // Hiển thị số trang

                    // Những thông số dành cho tab,
                    hovers: false, // Bật/tắt chức năng hover cho tab
                    overlays: false, // bật/tắt navigation overlays
                    tabs: false, // Bật/tắt chức năng sử dụng tab
                    tabWidth: 60, // Chiều rộng tab
                    tabHeight: 20, // set Chiều cao tab
                    arrows: false, // Thêm hai nút next prev mặt định của slide
                    cursor: 'pointer', // cursor css cho khu vực sidebar

                    hash: true, // Bật chức năng thay đổi hash trên URL
                    keyboard: true, // Sử dụng phím next và prev
                    next: $bttn_next, // Button Next
                    prev: $bttn_prev, // Button Prev

                    menu: null, // selector for element to use as the menu area, required for 'pageSelector'
                    pageSelector: false, // enables navigation with a dropdown menu of pages, requires 'menu'
                    chapterSelector: false, // enables navigation with a dropdown menu of chapters, determined by the "rel" attribute, requires 'menu'

                    shadows: true, // display shadows on page animations
                    shadowTopFwdWidth: 166, // shadow width for top forward anim
                    shadowTopBackWidth: 166, // shadow width for top back anim
                    shadowBtmWidth: 50, // shadow width for bottom shadow
                    auto : true,
                    delay : 1000,
                    before: function() {
                        // Nếu bạn muốn xử lý gì đó TRƯỚC khi lật rang thì viết ở đây
                    },
                    after: function() {
                        // Nếu bạn muốn xử lý gì đó SAU khi lật rang thì viết ở đây
                    }
                });
            }
        }).attr('src', source); // Phải gán src cho hình sau sự kiện load
    });
});
Ở phần comment tôi có giải thích rất kỹ rồi, nếu bạn từng sử dụng qua nhiều plugin thì điều này rất dễ dàng để hiểu
5. Lời kết
Ở phần cấu hình các thông số của plugin booklet tôi có giải thích một số thông tin bằng tiếng việt, còn một số tôi không biết dịch sang tiếng việt thế nào cho dễ hiểu nên tôi để tiếng anh luôn mong các bạn thông cảm.
Trong bài này tôi có tham khảo nguồn trên mạng và biên dịch + giải thích theo sự hiểu biết của tôi nên nếu bạn có khả năng đọc tiếng anh thì có thể lên mạng tham khảo thêm. Bạn hãy download source về để tham khảo nhé.
Link thao khảo các plugin: