Form Submission trong ReactJS
Trong bài tập này, mình sẽ tìm hiểu cách tạo một biểu mẫu trong React để người dùng có thể thêm mới một người dùng vào danh sách thông qua một API công cộng.
Tạo một biểu mẫu trong ReactJS
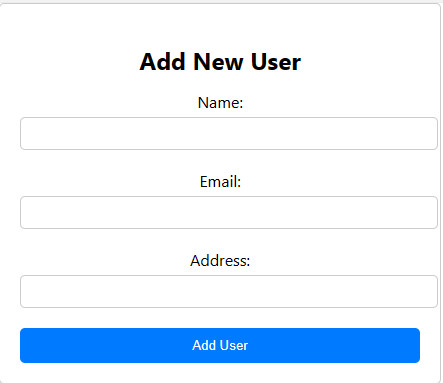
Trong bài tập này, mình sẽ tạo một biểu mẫu cho phép người dùng nhập thông tin của người dùng mới, sau đó xử lý dữ liệu nhập từ biểu mẫu và gửi yêu cầu POST tới API để thêm mới người dùng vào danh sách.
Mình sẽ tiếp tục thực hiện bài tập bằng cách tạo một component Form và xử lý dữ liệu nhập từ người dùng, sau đó gửi yêu cầu POST tới API.
Bước 1: Tạo Component Form
Trong component Form, mình sẽ tạo một biểu mẫu HTML để người dùng nhập thông tin của người dùng mới.
import React, { useState } from 'react';
import axios from 'axios';
import './Form.css'; // Import file CSS

const Form = () => {
  const [formData, setFormData] = useState({
    name: '',
    email: '',
    address: '',
  });

  const handleChange = e => {
    setFormData({ ...formData, [e.target.name]: e.target.value });
  };

  const handleSubmit = async e => {
    e.preventDefault();
    try {
      await axios.post('https://jsonplaceholder.typicode.com/users', formData);
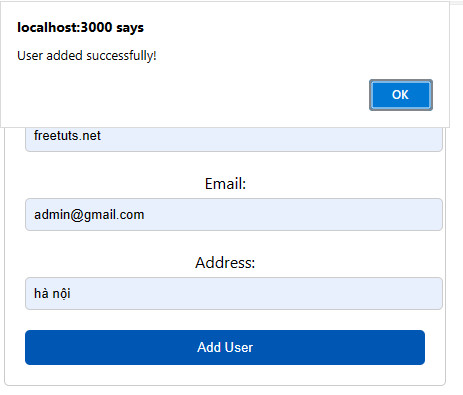
      alert('User added successfully!');
    } catch (error) {
      console.error('Error adding user:', error);
      alert('Failed to add user. Please try again.');
    }
  };

  return (
    <div className="form-container"> {/* Thêm className để áp dụng CSS */}
      <h2>Add New User</h2>
      <form onSubmit={handleSubmit}>
        <label>
          Name:
          <input type="text" name="name" value={formData.name} onChange={handleChange} />
        </label>
        <label>
          Email:
          <input type="email" name="email" value={formData.email} onChange={handleChange} />
        </label>
        <label>
          Address:
          <input type="text" name="address" value={formData.address} onChange={handleChange} />
        </label>
        <button type="submit">Add User</button>
      </form>
    </div>
  );
};

export default Form;
Bước 2: Cập nhật CSS (Nếu Cần)
Và sau đó, bạn có thể tạo một file CSS mới có tên là Form.css và định nghĩa các kiểu CSS cho form-container:
.form-container {
  max-width: 400px;
  margin: 0 auto;
  padding: 20px;
  border: 1px solid #ccc;
  border-radius: 5px;
}

.form-container h2 {
  margin-bottom: 15px;
}

.form-container label {
  display: block;
  margin-bottom: 10px;
}

.form-container input {
  width: 100%;
  padding: 8px;
  margin-top: 5px;
  margin-bottom: 10px;
  border: 1px solid #ccc;
  border-radius: 5px;
}

.form-container button {
  width: 100%;
  padding: 10px;
  background-color: #007bff;
  color: #fff;
  border: none;
  border-radius: 5px;
  cursor: pointer;
}

.form-container button:hover {
  background-color: #0056b3;
}
Bước 3: Import và sử dụng Component Form
Import component Form vào trong App.js và sử dụng nó trong ứng dụng của bạn.
// src/App.js
import React from 'react';
import Form from './components/Form';
import './App.css';

function App() {
  return (
    <div className="App">
      <Form />
    </div>
  );
}

export default App;


Kết bài
Trong bài tập này, mình đã tạo một biểu mẫu cho phép người dùng thêm mới một người dùng vào danh sách thông qua một API công cộng. Bằng cách xử lý dữ liệu nhập từ biểu mẫu và gửi yêu cầu POST tới API, mình có thể mở rộng tính năng của ứng dụng và tạo ra một trải nghiệm tốt hơn cho người dùng.
Bài giải
-------------------- ######## --------------------
Câu hỏi thường gặp liên quan:
- Fetching Data from API trong ReactJS
- Displaying Details trong ReactJS
- Searching Data trong ReactJS
- Pagination trong ReactJS
- Loading Indicator trong ReactJS
- Error Handling trong ReactJS
- Form Submission trong ReactJS
- Authentication trong ReactJS
- Deleting Data trong ReactJS
- File Upload trong ReactJS
- Real-time Updates trong ReactJS
- External APIs Integration trong ReactJS
- Rate Limiting và Throttling trong ReactJS

 Các hàm xử lý chuỗi trong Javascript (cắt / tách / nối chuỗi ..)
  Chia lấy phần dư / chia lấy phần nguyên trong javascript
  Các cách khai báo biến trong Javascript
  Các sự kiện (Event) trong Javascript
  Hướng tạo thanh search bar bằng CSS
  Hàm array.slice() trong Javascript
  Tính tổng hai số bằng Javascript (cộng hai số)
  Cách khai báo biến trong PHP, các loại biến thường gặp
  Download và cài đặt Vertrigo Server
  Thẻ li trong HTML
  Thẻ article trong HTML5
  Cấu trúc HTML5: Cách tạo template HTML5 đầu tiên
  Cách dùng thẻ img trong HTML và các thuộc tính của img
  Thẻ a trong HTML và các thuộc tính của thẻ a thường dùng

