Tạo một component SimpleConditionalRendering trong ReactJS
Trong loạt bài tập này về ReactJS về Conditional Rendering, mình sẽ thực hiện Bài 1 - "Simple Conditional Rendering ". Trong bài này, mình sẽ tạo một component SimpleConditionalRendering để hiển thị một phần tử <p> chỉ khi một biến showMessage được đặt thành true.
Simple Conditional Rendering trong ReactJS
Mình sẽ bắt đầu bằng việc tạo một ứng dụng React mới và thêm component SimpleConditionalRendering vào đó.
Bước 1: Tạo một ứng dụng React mới
npx create-react-app react-conditional-rendering
cd react-conditional-rendering
Bước 2: Tạo component SimpleConditionalRendering
Trong thư mục src, tạo một file mới có tên là SimpleConditionalRendering.js. File này sẽ chứa component SimpleConditionalRendering.
SimpleConditionalRendering.js
import React from 'react';

const SimpleConditionalRendering = ({ showMessage }) => {
  return (
    <div>
      {showMessage && <p>Hello, world!</p>}
    </div>
  );
};

export default SimpleConditionalRendering;
Bước 3: Sử dụng component SimpleConditionalRendering trong App
Sửa nội dung file src/App.js để sử dụng component SimpleConditionalRendering.
App.js
import React, { useState } from 'react';
import SimpleConditionalRendering from './SimpleConditionalRendering';
import './App.css';

function App() {
  const [showMessage, setShowMessage] = useState(true);

  return (
    <div className="App">
      <h1>React Conditional Rendering Exercise</h1>
      <button onClick={() => setShowMessage(!showMessage)}>
        {showMessage ? 'Hide Message' : 'Show Message'}
      </button>
      <SimpleConditionalRendering showMessage={showMessage} />
    </div>
  );
}

export default App;
Bước 4: Tạo file CSS cho App
Nếu chưa có, tạo một file CSS mới có tên là App.css trong thư mục src.
App.css
.App {
  text-align: center;
  margin-top: 50px;
}

button {
  margin-bottom: 20px;
  padding: 10px 20px;
  font-size: 16px;
  cursor: pointer;
}

button:hover {
  background-color: #ddd;
}
Bước 5: Chạy ứng dụng React
Quay lại terminal và chạy lệnh sau để khởi động ứng dụng React:
npm start
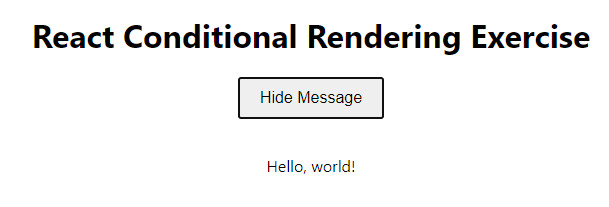
Mở trình duyệt và truy cập http://localhost:3000 để xem ứng dụng của bạn. Bạn sẽ thấy một nút "Show Message", khi nhấn vào đó, "Hello, world!" sẽ được hiển thị. Khi nhấn nút lại, "Hello, world!" sẽ biến mất.


Kết bài:
Với bài tập "Simple Conditional Rendering nâng cao" này, mình đã tạo một component để hiển thị một phần tử chỉ khi một biến điều kiện được đặt thành true. Điều này là một phần quan trọng trong việc quản lý hiển thị các phần tử dựa trên điều kiện trong ứng dụng React của bạn. Hãy tiếp tục thực hành và tìm hiểu các tính năng khác của ReactJS để nâng cao kỹ năng lập trình của bạn!
Bài giải
-------------------- ######## --------------------
Câu hỏi thường gặp liên quan:
- Tạo một component SimpleConditionalRendering trong ReactJS
- Tạo một component UserAuthentication trong ReactJS
- Tạo một component RoleBasedAccessControl trong ReactJS
- Tạo Conditional Component trong ReactJS
- Tạo một component WeatherDisplay trong ReactJS
- Tạo một component ErrorMessage trong ReactJS
- Tạo một component ConditionalStyling trong ReactJS
- Tạo một component LoginForm trong ReactJS
- Tạo một component ShowHideElement trong ReactJS
- Tạo một component ConditionalRenderingWithList trong ReactJS
- Tạo một component SubscriptionPlan trong ReactJS
- Tạo một component OnlineOfflineStatus trong ReactJS
- Tạo một component ShoppingCart trong ReactJS
- Tạo một component ShowHideModal trong ReactJS
- Tạo một component ConditionalNavigation trong ReactJS

 Các hàm xử lý chuỗi trong Javascript (cắt / tách / nối chuỗi ..)
  Chia lấy phần dư / chia lấy phần nguyên trong javascript
  Các cách khai báo biến trong Javascript
  Các sự kiện (Event) trong Javascript
  Hướng tạo thanh search bar bằng CSS
  Hàm array.slice() trong Javascript
  Tính tổng hai số bằng Javascript (cộng hai số)
  Cách khai báo biến trong PHP, các loại biến thường gặp
  Download và cài đặt Vertrigo Server
  Thẻ li trong HTML
  Thẻ article trong HTML5
  Cấu trúc HTML5: Cách tạo template HTML5 đầu tiên
  Cách dùng thẻ img trong HTML và các thuộc tính của img
  Thẻ a trong HTML và các thuộc tính của thẻ a thường dùng

