Tạo một component SubscriptionPlan trong ReactJS
Trong bài tập này, mình sẽ thực hành Conditional Rendering với component SubscriptionPlan để hiển thị thông tin về các gói đăng ký dựa trên một biến planType.
Subscription Plan trong ReactJS
Trong bài này, mình sẽ tạo một component SubscriptionPlan để hiển thị thông tin về các gói đăng ký. Dựa trên giá trị của biến planType, component sẽ hiển thị nội dung tương ứng với gói đăng ký được chọn.
Bước 1: Tạo Component SubscriptionPlan
Trong thư mục src, tạo một file mới có tên là SubscriptionPlan.js để chứa component SubscriptionPlan.
SubscriptionPlan.js
import React from 'react';
import './SubscriptionPlan.css';

const SubscriptionPlan = ({ planType }) => {
  return (
    <div className="subscription-plan">
      <h2>Subscription Plan</h2>
      {planType === 'basic' && (
        <div>
          <h3>Basic Plan</h3>
          <p>$10/month</p>
          <p>Access to basic features</p>
        </div>
      )}
      {planType === 'premium' && (
        <div>
          <h3>Premium Plan</h3>
          <p>$20/month</p>
          <p>Access to premium features</p>
        </div>
      )}
      {planType === 'ultimate' && (
        <div>
          <h3>Ultimate Plan</h3>
          <p>$30/month</p>
          <p>Access to all features</p>
        </div>
      )}
    </div>
  );
};

export default SubscriptionPlan;
Bước 2: Tạo File CSS
Trong thư mục src, tạo một file mới có tên là SubscriptionPlan.css để định dạng giao diện cho component SubscriptionPlan.
SubscriptionPlan.css
.subscription-plan {
  margin-top: 20px;
  border: 1px solid #ccc;
  padding: 20px;
}

.subscription-plan h3 {
  margin-top: 0;
}

.subscription-plan div {
  margin-bottom: 20px;
}
Bước 3: Sử dụng Component SubscriptionPlan trong App
Sửa nội dung file src/App.js để sử dụng component SubscriptionPlan.
App.js
import React, { useState } from 'react';
import SubscriptionPlan from './SubscriptionPlan';

function App() {
  const [planType, setPlanType] = useState('basic');

  const handlePlanChange = (type) => {
    setPlanType(type);
  };

  return (
    <div className="App">
      <div>
        <button onClick={() => handlePlanChange('basic')}>Basic Plan</button>
        <button onClick={() => handlePlanChange('premium')}>Premium Plan</button>
        <button onClick={() => handlePlanChange('ultimate')}>Ultimate Plan</button>
      </div>
      <SubscriptionPlan planType={planType} />
    </div>
  );
}

export default App;
Bước 4: Chạy ứng dụng React
Quay lại terminal và chạy lệnh sau để khởi động ứng dụng React:
npm start
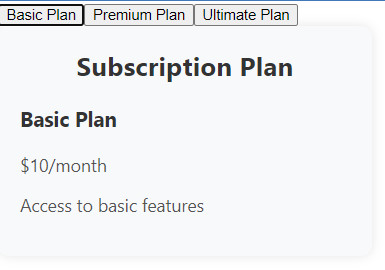
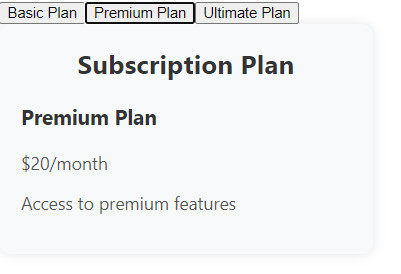
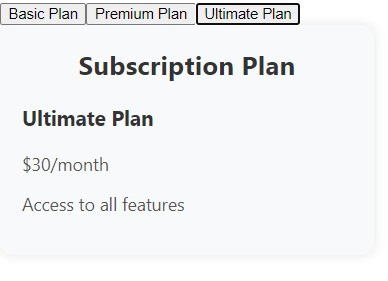
Mở trình duyệt và truy cập http://localhost:3000 để xem kết quả. Bạn sẽ thấy một giao diện hiển thị thông tin về các gói đăng ký, và nội dung sẽ thay đổi tùy thuộc vào gói đăng ký được chọn.
Kết bài:
Trong bài tập "Subscription Plan nâng cao" này, mình đã thực hành Conditional Rendering để hiển thị thông tin về các gói đăng ký dựa trên một biến điều kiện. Điều này có thể được mở rộng để xây dựng các tính năng động và linh hoạt trong ứng dụng ReactJS của bạn. Hãy tiếp tục thực hành và tìm hiểu thêm về các tính năng của ReactJS để nâng cao kỹ năng lập trình của bạn!
Bài giải
-------------------- ######## --------------------
Câu hỏi thường gặp liên quan:
- Tạo một component SimpleConditionalRendering trong ReactJS
- Tạo một component UserAuthentication trong ReactJS
- Tạo một component RoleBasedAccessControl trong ReactJS
- Tạo Conditional Component trong ReactJS
- Tạo một component WeatherDisplay trong ReactJS
- Tạo một component ErrorMessage trong ReactJS
- Tạo một component ConditionalStyling trong ReactJS
- Tạo một component LoginForm trong ReactJS
- Tạo một component ShowHideElement trong ReactJS
- Tạo một component ConditionalRenderingWithList trong ReactJS
- Tạo một component SubscriptionPlan trong ReactJS
- Tạo một component OnlineOfflineStatus trong ReactJS
- Tạo một component ShoppingCart trong ReactJS
- Tạo một component ShowHideModal trong ReactJS
- Tạo một component ConditionalNavigation trong ReactJS

 Các hàm xử lý chuỗi trong Javascript (cắt / tách / nối chuỗi ..)
  Chia lấy phần dư / chia lấy phần nguyên trong javascript
  Các cách khai báo biến trong Javascript
  Các sự kiện (Event) trong Javascript
  Hướng tạo thanh search bar bằng CSS
  Hàm array.slice() trong Javascript
  Tính tổng hai số bằng Javascript (cộng hai số)
  Cách khai báo biến trong PHP, các loại biến thường gặp
  Download và cài đặt Vertrigo Server
  Thẻ li trong HTML
  Thẻ article trong HTML5
  Cấu trúc HTML5: Cách tạo template HTML5 đầu tiên
  Cách dùng thẻ img trong HTML và các thuộc tính của img
  Thẻ a trong HTML và các thuộc tính của thẻ a thường dùng
