Tạo một component ScrollEvent trong ReactJS
Trong bài tập này, mình sẽ tạo một component có tên là ScrollEvent để theo dõi sự kiện cuộn và hiển thị vị trí cuộn mới trong console. Điều này sẽ giúp bạn hiểu cách sử dụng hook useEffect để thêm và xóa bộ lắng nghe sự kiện.
Scroll Event trong ReactJS
Đầu tiên, mình sẽ tạo component ScrollEvent. Hãy bắt đầu bằng cách tạo một file mới có tên là ScrollEvent.js. Trong file này, mình sẽ triển khai logic xử lý sự kiện cuộn và hiển thị vị trí cuộn mới.
ScrollEvent.js:
// ScrollEvent.js
import React, { useEffect } from 'react';
import './ScrollEvent.css';

const ScrollEvent = () => {
  useEffect(() => {
    const handleScroll = () => {
      const scrollTop = window.scrollY;
      console.log('Scroll position:', scrollTop);
    };

    window.addEventListener('scroll', handleScroll);

    return () => {
      window.removeEventListener('scroll', handleScroll);
    };
  }, []);

  return (
    <div className="scroll-event">
      <h2>Scroll Event trong ReactJS</h2>
      <div className="content">
        <p>
          Lorem ipsum dolor sit amet, consectetur adipiscing elit. Sed ac magna euismod,
          ultricies sapien in, hendrerit ligula. Fusce efficitur justo nec orci gravida,
          id consequat neque eleifend. Nunc sodales ultrices metus, ut efficitur mauris
          blandit eu. Sed nec tellus eget tortor facilisis tristique. Sed venenatis justo
          at turpis varius, vitae scelerisque neque dapibus. Integer vel dolor a orci
          efficitur ultricies at ac purus. Duis id velit at purus tempor volutpat non
          vitae nibh. Quisque aliquet accumsan risus, a dignissim felis malesuada eu.
        </p>
        <p>
          Proin auctor, dolor sit amet accumsan ultrices, urna odio hendrerit augue,
          vitae imperdiet justo risus non libero. Maecenas dapibus risus non dolor
          consectetur tincidunt. Integer sit amet risus vel quam congue malesuada.
          Quisque malesuada tristique tincidunt. Sed eget aliquam elit. Vivamus auctor
          vestibulum nisl, nec pharetra justo interdum a. Vestibulum tincidunt orci
          et felis mattis tristique.
        </p>
        {/* Thêm thêm nội dung ở đây */}
      </div>
    </div>
  );
};

export default ScrollEvent;
ScrollEvent.css:
/* ScrollEvent.css */
.scroll-event {
  padding: 20px;
}

.content {
  height: 1000px; /* Để có nội dung cuộn */
  border: 1px solid #ddd;
}
Tích hợp vào ứng dụng
Sau khi đã triển khai component ScrollEvent, mình sẽ tích hợp nó vào ứng dụng ReactJS. Mở file App.js và thêm ScrollEvent vào trong đó.
App.js:
// App.js
import React from 'react';
import ScrollEvent from './components/ScrollEvent';

const App = () => {
  return (
    <div>
      <h1>ReactJS Handling Events Exercises</h1>
      <ScrollEvent />
      {/* Các component khác có thể được thêm vào đây */}
    </div>
  );
};

export default App;
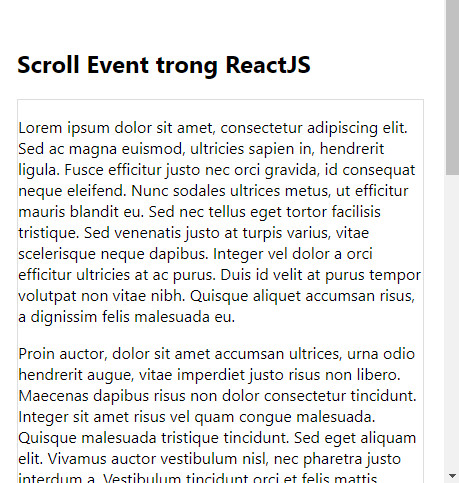
Kết quả:

Trong bài tập này, mình đã tìm hiểu cách tạo một component ReactJS để xử lý sự kiện cuộn. Bạn hiện đã có khả năng theo dõi vị trí cuộn của người dùng và thực hiện các tác vụ cụ thể dựa trên sự kiện cuộn đó.
Hãy tiếp tục với các bài tập tiếp theo để mở rộng kiến thức của bạn về xử lý sự kiện trong ReactJS. Chúc bạn có những trải nghiệm lập trình thú vị!
Bài giải
-------------------- ######## --------------------
Câu hỏi thường gặp liên quan:
- Tạo một component ButtonClick trong ReactJS
- Tạo một component ToggleButton trong ReactJS
- Tạo một component InputChange trong ReactJS
- Tạo một component MouseHover trong ReactJS
- Tạo một component FormSubmission trong ReactJS
- Tạo một component DoubleClick có chứa một phần tử trong ReactJS
- Tạo một component KeyPress trong ReactJS
- Tạo một component Image Click trong ReactJS
- Tạo một component Context Menu trong ReactJS
- Tạo một component Drag and Drop trong ReactJS
- Tạo một component LinkClick trong ReactJs
- Tạo một component ResizeWindow trong ReactJS
- Tạo một component HoverEffect trong ReactJS
- Tạo một component DynamicButton trong ReactJS
- Tạo một component PasswordStrengthChecker trong ReactJS
- Tạo một component CopyToClipboard trong ReactJS
- Tạo một component ScrollEvent trong ReactJS
- Tạo một component Autocomplete trong ReactJS

 Các hàm xử lý chuỗi trong Javascript (cắt / tách / nối chuỗi ..)
  Chia lấy phần dư / chia lấy phần nguyên trong javascript
  Các cách khai báo biến trong Javascript
  Các sự kiện (Event) trong Javascript
  Hướng tạo thanh search bar bằng CSS
  Hàm array.slice() trong Javascript
  Tính tổng hai số bằng Javascript (cộng hai số)
  Cách khai báo biến trong PHP, các loại biến thường gặp
  Download và cài đặt Vertrigo Server
  Thẻ li trong HTML
  Thẻ article trong HTML5
  Cấu trúc HTML5: Cách tạo template HTML5 đầu tiên
  Cách dùng thẻ img trong HTML và các thuộc tính của img
  Thẻ a trong HTML và các thuộc tính của thẻ a thường dùng

