Bài 18: PHP trang tin tức - Các chức năng của profile admin (tiếp theo)
Hello, chào mừng các bạn đã quay trở lại với series hướng dẫn xây dựng trang tin tức PHP. Trong bài học trước, chúng ta đã xây dựng đựng chức năng cập nhật ảnh đại diện của phần profile admin rồi, ngày hôm nay mình sẽ hướng dẫn các bạn build các chức năng còn lại. Chúng ta đi vào bài học thôi!

1. Cập nhật nội dung bài học
Trước khi vào bài, các bạn vào table accounts và chỉnh sửa field phone sang dạng VARCHAR(11) (thay vì ban đầu là INT(11)).
2. Chức năng cập nhật các thông tin
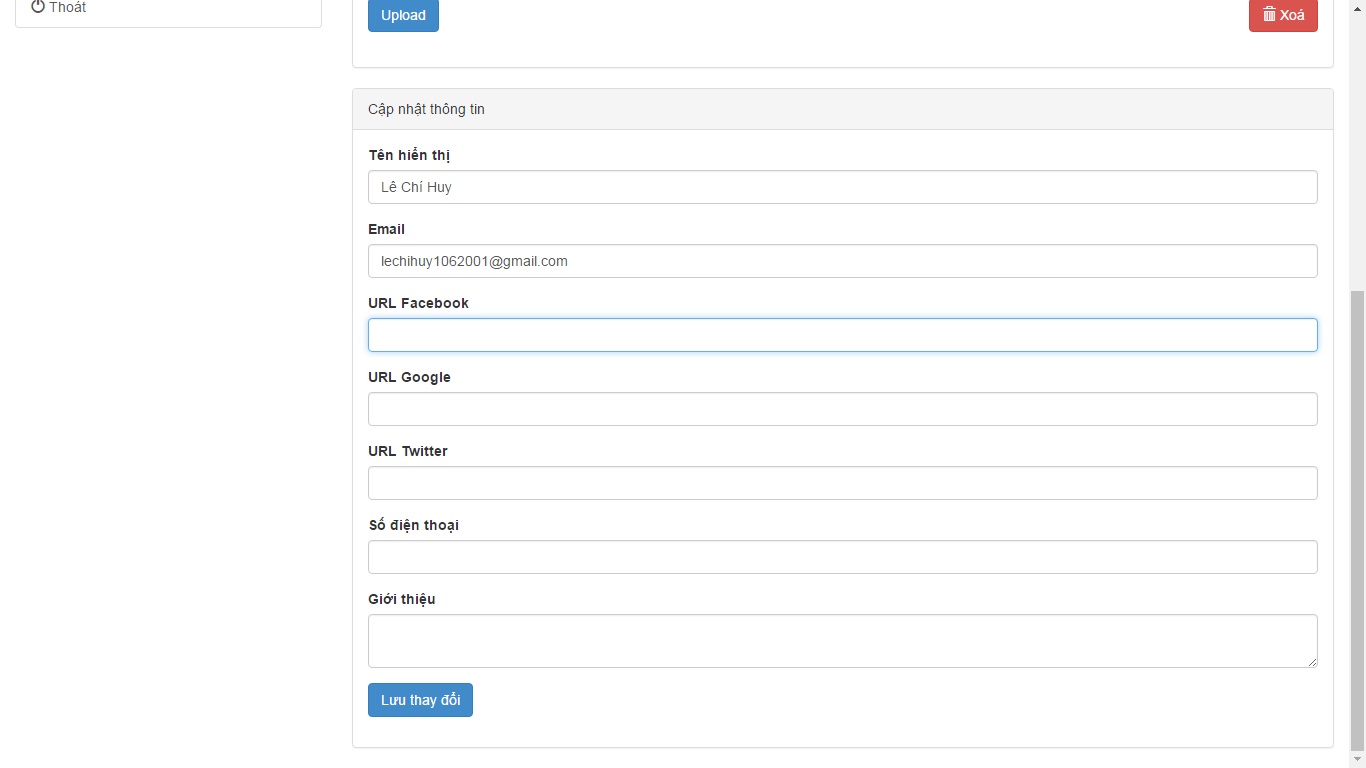
Chức năng này cho phép chúng ta có thể update các thông tin của tài khoản, bao gồm
- Tên hiển thị
- URL Facebook
- URL Google
- URL Twitter
- Số điện thoại
- Giới thiệu
Xây dựng template
Các bạn mở file admin/templates/profile.php lên và dán nội dung này bên dưới dòng // Form cập nhật các thông tin còn lại:
Bài viết này được đăng tại [free tuts .net]
echo
'
	<div class="panel panel-default">
		<div class="panel-heading">Cập nhật thông tin</div>
		<div class="panel-body">
			<form method="POST" onsubmit="return false;" id="formUpdateInfo">
				<div class="form-group">
					<label>Tên hiển thị *</label>
					<input type="text" class="form-control" id="dn_update" value="' . $data_user['display_name'] . '">
				</div>
				<div class="form-group">
					<label>Email *</label>
					<input type="text" class="form-control" id="email_update" value="' . $data_user['email'] . '">
				</div>
				<div class="form-group">
					<label>URL Facebook</label>
					<input type="text" class="form-control" id="fb_update" value="' . $data_user['facebook'] . '">
				</div>
				<div class="form-group">
					<label>URL Google</label>
					<input type="text" class="form-control" id="gg_update" value="' . $data_user['google'] . '">
				</div>
				<div class="form-group">
					<label>URL Twitter</label>
					<input type="text" class="form-control" id="tt_update" value="' . $data_user['twitter'] . '">
				</div>
				<div class="form-group">
					<label>Số điện thoại</label>
					<input type="text" class="form-control" id="phone_update" value="' . $data_user['phone'] . '">
				</div>
				<div class="form-group">
					<label>Giới thiệu</label>
					<textarea id="desc_update" class="form-control">' . $data_user['description'] . '</textarea>
				</div>
				<div class="form-group">
					<button type="submit" class="btn btn-primary">Lưu thay đổi</button>
				</div>
				<div class="alert alert-danger hidden"></div>
			</form>
		</div>
	</div>
';

// Form đổi mật khẩu
Lưu và sao đó chạy project, các bạn sẽ được kết quả như hình:
 Viết Ajax gửi dữ liệu
Cái này mình nghĩ sẽ rất đơn giản nếu bạn nào đã theo dõi đến bài này của series, các bạn hãy thử code và đối chiếu với code của mình bên dưới nhé.
Mở file admin/js/form.js và dán dòng code này vào:
// Cập nhật thông tin khác
$('#formUpdateInfo button').on('click', function() {
	$('#formUpdateInfo button').html('Đang tải ...');
	$dn_update = $('#dn_update').val();
	$email_update = $('#email_update').val();
	$fb_update = $('#fb_update').val();
	$gg_update = $('#gg_update').val();
	$tt_update = $('#tt_update').val();
	$phone_update = $('#phone_update').val();
	$desc_update = $('#desc_update').val();

	if ($dn_update && $email_update) {
		$.ajax({
			url : $_DOMAIN + 'profile.php',
			type : 'POST',
			data : {
				dn_update : $dn_update,
				email_update : $email_update,
				fb_update : $fb_update,
				gg_update : $gg_update,
				tt_update : $tt_update,
				phone_update : $phone_update,
				desc_update : $desc_update,
				action : 'update_info'
			}, success : function(data) {
				$('#formUpdateInfo .alert').removeClass('hidden');
				$('#formUpdateInfo .alert').html(data);
			}, error : function() {
				$('#formUpdateInfo .alert').removeClass('hidden');
				$('#formUpdateInfo .alert').html('Đã có lỗi xảy ra, vui lòng thử lại.');
			}
		});
		$('#formUpdateInfo button').html('Lưu thay đổi');
	} else {
		$('#formUpdateInfo button').html('Lưu thay đổi');
        $('#formUpdateInfo .alert').removeClass('hidden');
        $('#formUpdateInfo .alert').html('Vui lòng điền đầy đủ thông tin.');
	}
});
Viết PHP xử lý dữ liệu
Cái này cũng quá quen thuộc rồi, ở phần này chúng ta chỉ cần kiểm tra cái field: tên hiển thị, email và số điện thoại (nếu có).
Các bạn mở file admin/profile.php và dán đoạn code này bên dưới code // Xoá ảnh đại diện:
// Cập nhật các thông tin
else if ($action == 'update_info')
{
	// Xử lý các giả trị
	$dn_update = trim(htmlspecialchars(addslashes($_POST['dn_update'])));
	$email_update = trim(htmlspecialchars(addslashes($_POST['email_update'])));
	$fb_update = trim(htmlspecialchars(addslashes($_POST['fb_update'])));
	$gg_update = trim(htmlspecialchars(addslashes($_POST['gg_update'])));
	$tt_update = trim(htmlspecialchars(addslashes($_POST['tt_update'])));
	$phone_update = trim(htmlspecialchars(addslashes($_POST['phone_update'])));
	$desc_update = trim(htmlspecialchars(addslashes($_POST['desc_update'])));

	// Các biến xử lý thông báo
	$show_alert = '<script>$("#formUpdateInfo .alert").removeClass("hidden");</script>';
	$hide_alert = '<script>$("#formUpdateInfo .alert").addClass("hidden");</script>';
	$success = '<script>$("#formUpdateInfo .alert").attr("class", "alert alert-success");</script>';

	if ($dn_update && $email_update) {
		// Kiểm tra tên hiển thị
		if (strlen($dn_update) < 3 || strlen($dn_update) > 50) {
			echo $show_alert.'Tên hiển thị phải nằm trong khoảng từ 3-50 ký tự.';
		// Kiểm tra email
		} else if (filter_var($email_update, FILTER_VALIDATE_EMAIL) === FALSE) {
			echo $show_alert.'Email không hợp lệ.';
		// Kiểm tra số điện thoại
		} else if ($phone_update && (strlen($phone_update) < 10 || strlen($phone_update) > 11 || preg_match('/^[0-9]+$/', $phone_update) == false)) {
			echo $show_alert.strlen($phone_update) . 'Số điện thoại không hợp lệ.';
		} else {
			$sql_update_info = "UPDATE accounts SET
				display_name = '$dn_update',
				email = '$email_update',
				facebook = '$fb_update',
				google = '$gg_update',
				twitter = '$tt_update',
				phone = '$phone_update',
				description = '$desc_update'
				WHERE id_acc = '$data_user[id_acc]'
			";
			$db->query($sql_update_info);
			echo $success.'Cập nhật thông tin thành công.';
			new Redirect($_DOMAIN.'profile');
		}
	} else {
		echo $show_alert.'Vui lòng điền đầy đủ thông tin.';
	}
}3. Chức năng đổi mật khẩu
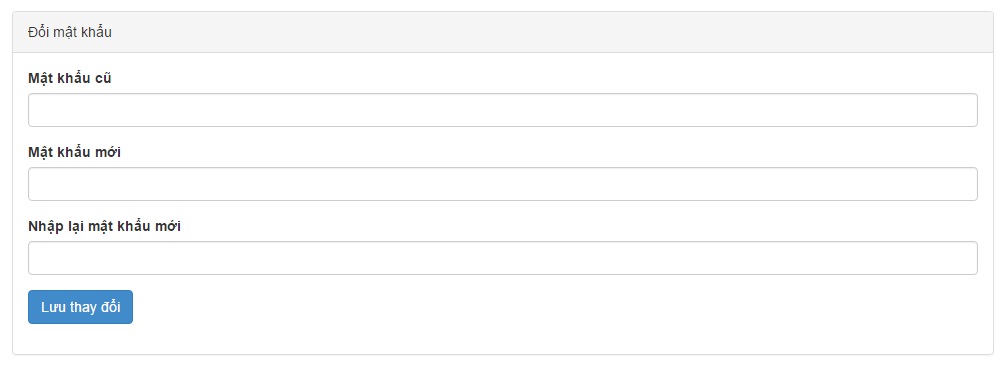
Đây là chức năng cuối cùng trong phần này, chức năng cũng đơn giản nên các bạn có thể tự làm và tham khảo code của mình nhé!
Xây dựng template
Các bạn copy nội dung này và chèn bên dưới dòng // Form đổi mật khẩu trong file admin/templates/profile.php:
echo
'
	<div class="panel panel-default">
		<div class="panel-heading">Đổi mật khẩu</div>
		<div class="panel-body">
			<form method="POST" id="formChangePw" onsubmit="return false;">
				<div class="form-group">
					<label>Mật khẩu cũ</label>
					<input type="password" class="form-control" id="oldPwChange">
				</div>
				<div class="form-group">
					<label>Mật khẩu mới</label>
					<input type="password" class="form-control" id="newPwChange">
				</div>
				<div class="form-group">
					<label>Nhập lại mật khẩu mới</label>
					<input type="password" class="form-control" id="reNewPwChange">
				</div>
				<div class="form-group">
					<button type="submit" class="btn btn-primary">Lưu thay đổi</button>
				</div>
				<div class="alert alert-danger hidden"></div>
			</form>
		</div>
	</div>
';

Viết Ajax gửi dữ liệu
Mở file admin/js/form.js lên, sau đó các bạn dán đoạn code này:
$('#formChangePw button').on('click', function() {
	$('#formChangePw button').html('Đang tải ...');
	$old_pw_change = $('#old_pw_change').val();
	$new_pw_change = $('#new_pw_change').val();
	$re_new_pw_change = $('#re_new_pw_change').val();

	if ($old_pw_change && $new_pw_change && $re_new_pw_change) {
		$.ajax({
			url : $_DOMAIN + 'profile.php',
			type : 'POST',
			data : {
				old_pw_change : $old_pw_change,
				new_pw_change : $new_pw_change,
				re_new_pw_change : $re_new_pw_change,
				action : 'change_pw'
			}, success : function(data) {
				$('#formChangePw .alert').removeClass('hidden');
        		$('#formChangePw .alert').html(data);
			}, error : function() {
				$('#formChangePw .alert').removeClass('hidden');
        		$('#formChangePw .alert').html('Đã có lỗi xảy ra, vui lòng thủ lại.');
			}
		});
		$('#formChangePw button').html('Lưu thay đổi');
	} else {
		$('#formChangePw button').html('Lưu thay đổi');
        $('#formChangePw .alert').removeClass('hidden');
        $('#formChangePw .alert').html('Vui lòng điền đầy đủ thông tin.');
	}
});
Viết PHP xử lý dữ liệu
Các bạn copy đoạn code này bên dưới code // Cập nhật thông tin trong file admin/profile.php:
// Đổi mật khẩu
else if ($action == 'change_pw')
{
	// Xử lý các giá trị
	$old_pw_change = md5($_POST['old_pw_change']);
	$new_pw_change = trim(htmlspecialchars(addslashes($_POST['new_pw_change'])));
	$re_new_pw_change = trim(htmlspecialchars(addslashes($_POST['re_new_pw_change'])));

	// Các biến xử lý thông báo
	$show_alert = '<script>$("#formChangePw .alert").removeClass("hidden");</script>';
	$hide_alert = '<script>$("#formChangePw .alert").addClass("hidden");</script>';
	$success = '<script>$("#formChangePw .alert").attr("class", "alert alert-success");</script>';

	if ($old_pw_change && $new_pw_change && $re_new_pw_change) {
		// Kiểm tra mật khẩu cũ chính xác
		if ($old_pw_change != $data_user['password']) {
			echo $show_alert.'Mật khẩu cũ không chính xác.';
		// Kiểm tra mật khẩu mới
		} else if (strlen($new_pw_change) < 6) {
			echo $show_alert.'Mật khẩu mới quá ngắn.';
		// Kiểm tra mật khẩu mới khớp với mật khẩu mới nhập lại
		} else if ($new_pw_change != $re_new_pw_change) {
			echo $show_alert.'Mật khẩu mới nhập lại không khớp.';
		} else {
			$new_pw_change = md5($new_pw_change);
			$sql_change_pw = "UPDATE accounts SET password = '$new_pw_change' WHERE id_acc = '$data_user[id_acc]'";
			$db->query($sql_change_pw);
			echo $success.'Thay đổi mật khẩu thành công.';
			new Redirect($_DOMAIN.'profile');
		}
	} else {
		echo $show_alert.'Vui lòng điền đầy đủ thông tin.';
	}
}4. Lời kết
Phù! Thế là đã xong phần profile admin rồi. Qua bài sau, chúng ta sẽ build phần cuối cùng trong admin, đó là dashboard. Nếu có gì thắc mắc, các bạn cứ comment bên dưới hoặc đăng trên group kèm theo link bài viết để được hỗ trợ sớm nhất. Cảm ơn các bạn đã theo dõi, chúc các bạn thành công!
Danh sách file tải về
| Tên file tải về | Pass giải nén |
|---|---|
| Bài 18: PHP trang tin tức - Các chức năng của profile admin (tiếp theo) | freetuts.net hoặc gameportable.net |

 Xây dựng chức năng đăng nhập và đăng ký với php và mysql
  Bảng mã ASCII chuẩn các hệ nhị phân - thập phân - thập lục phân
  Cách khai báo biến trong PHP, các loại biến thường gặp
  Bài 26: Hàm isset() và empty() trong php
  Các kiểu dữ liệu trong PHP và các loại biến tương ứng
  Bài 19: Phương thức GET và POST trong php
  Download và cài đặt Vertrigo Server
  Bài 20: Các hàm xử lý chuỗi trong php
  Thẻ li trong HTML
  Thẻ article trong HTML5
  Cấu trúc HTML5: Cách tạo template HTML5 đầu tiên
  Cách dùng thẻ img trong HTML và các thuộc tính của img
  Thẻ a trong HTML và các thuộc tính của thẻ a thường dùng
