Cách export dữ liệu từ DataGridView sang Excel trong C# Winforms
Trong bài viết này mình sẽ hướng dẫn các bạn cách Export dữ liệu từ DataGridView sang Excel trong C# Winforms. Các bạn cần có kiến thức cơ bản về C# Winforms và SQL Server, hãy tìm hiểu nó trước khi bắt đầu nhé.

1. Xây dựng form export dữ liệu trong C# Winforms
Việc đầu tiên chúng ta cần xây dựng form export dữ liệu với các control cần thiết như hình dưới đây.
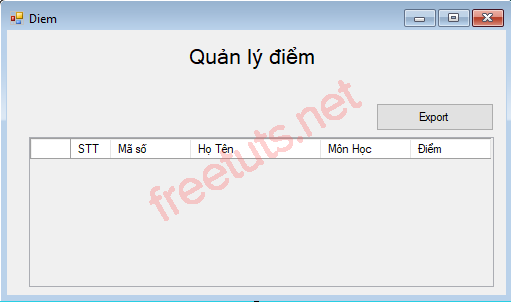
Trong đó:
- Button "Export": để xuất dữ liệu từ DataGridView sang Excel.
- DataGridView: Hiển thị danh sách điểm khi chương trình bắt đầu chạy. Có các columns STT, Mã số, Họ Tên, Môn Học, Điểm.
- SaveDialogResult: Lưu tên file và đường dẫn file.
2. Tạo database và Stored Procedure trong SQL Server
Trong ví dụ này mình sử dụng database StudentDB mà các bài trước mình vẫn hay sử dụng. Các bạn có thể xem lại hoặc sử dụng đoạn code sau để tạo database, sau đó thêm dữ liệu vào nhé.
Bài viết này được đăng tại [free tuts .net]
CREATE DATABASE StudentDB
GO
USE [StudentDB]
GO
/****** Object:  Table [dbo].[Diem]    Script Date: 8/25/2021 1:32:20 PM ******/
SET ANSI_NULLS ON
GO
SET QUOTED_IDENTIFIER ON
GO
CREATE TABLE [dbo].[Diem](
	[MaHS] [int] NOT NULL,
	[MaMH] [int] NOT NULL,
	[Diem] [float] NULL,
 CONSTRAINT [PK_Diem] PRIMARY KEY CLUSTERED
(
	[MaHS] ASC,
	[MaMH] ASC
)WITH (PAD_INDEX = OFF, STATISTICS_NORECOMPUTE = OFF, IGNORE_DUP_KEY = OFF, ALLOW_ROW_LOCKS = ON, ALLOW_PAGE_LOCKS = ON) ON [PRIMARY]
) ON [PRIMARY]

GO
Sau đó tạo một Stored Procedure để lấy dữ liệu từ bảng "Diem" trong SQL Server.
CREATE proc [dbo].[SP_LayDiem]
as
begin
	select MaHS,Name,TenMH,Diem from Student, Diem, MonHoc where Student.Id = Diem.MaHS and MonHoc.MaMH = Diem.MaMH
end
3. Kết nối và hiển thị dữ liệu trên DataGridView trong C# Winforms
Sau khi đã tạo giao diện, database và proc, bây giờ chúng ta sẽ kết nối tới database để gọi proc "SP_LayDiem" để hiển thị dữ liệu vào DataGridView. Để dữ liệu hiển thị ngay khi chương trình bắt đầu chạy thì ta viết trên sự kiện Form_Load.
Tạo chuỗi kết nối ở File App.config.
<?xml version="1.0" encoding="utf-8" ?>
<configuration>
    <startup>
        <supportedRuntime version="v4.0" sku=".NETFramework,Version=v4.7.2" />
    </startup>
    <connectionStrings>
		<add name="conStr" connectionString="server=DESKTOP-PQMLT59\VANQUYEN;database=StudentDb;integrated security=true"/>
	</connectionStrings>
</configuration>
Khởi tạo instance của class SqlConnection và gọi chuỗi kết nối từ file App.config bằng thuộc tính ConfigurationManager.
SqlConnection conn = new SqlConnection();
conn.ConnectionString = ConfigurationManager.ConnectionStrings["conStr"].ConnectionString;
Khai báo instance thuộc class SqlCommand để gọi proc từ SQL Server.
SqlCommand cmd = new SqlCommand("SP_LayDiem", conn);
cmd.CommandType = CommandType.StoredProcedure;
Sử dụng phương thức ExecuteReader() của class SqlDataReader để thực thi câu lệnh.
SqlDataReader dr;
conn.Open();
dr = cmd.ExecuteReader();
Sử dụng vòng lặp while để điền các dòng dữ liệu từ kết quả trả về của SQL Server vào DataGridView. Lưu ý, các dòng dữ liệu phải trùng kiểu dữ liệu trong SQL Server.
while (dr.Read())
{
        STT = STT + 1;
        dtgDiem.Rows.Add(STT, dr.GetInt32(0), dr.GetString(1), dr.GetString(2), dr.GetDouble(3));
}
Full code hiển thị dữ liệu vào DataGridView.
private void Diem_Load(object sender, EventArgs e)
        {
            dtgDiem.Rows.Clear();
            SqlConnection conn = new SqlConnection();
            conn.ConnectionString = ConfigurationManager.ConnectionStrings["conStr"].ConnectionString;
            SqlCommand cmd = new SqlCommand("SP_LayDiem", conn);
            cmd.CommandType = CommandType.StoredProcedure;
            SqlDataReader dr;
            conn.Open();
            dr = cmd.ExecuteReader();
            int STT = 0;
            while (dr.Read())
            {
                STT = STT + 1;
                dtgDiem.Rows.Add(STT, dr.GetInt32(0), dr.GetString(1), dr.GetString(2), dr.GetDouble(3));

            }
            dr.Close();
        }
Kết quả:
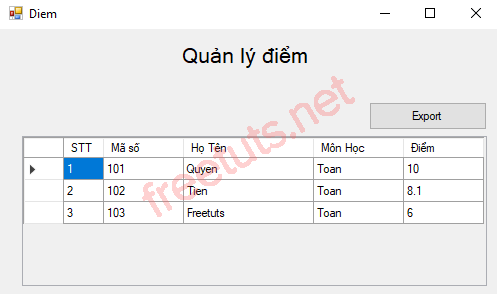
4. Export dữ liệu từ DataGridView sang Excel trong C# Winforms
Trước tiên, ta cần cài thêm Reference Microsoft.Office.Interop.Excel trong project. Cụ thể như sau:
Click chuột phải vào References trong mục Solution Explorer -> Chọn vào Add Reference.
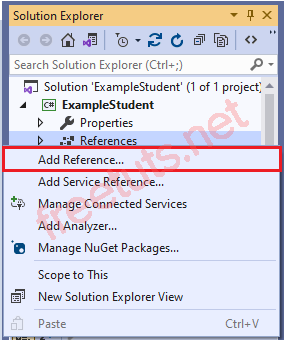
Một cửa sổ mới hiện ra, ta kéo xuống và chọn vào Microsoft Excel trong mục COM như hình dưới đây.
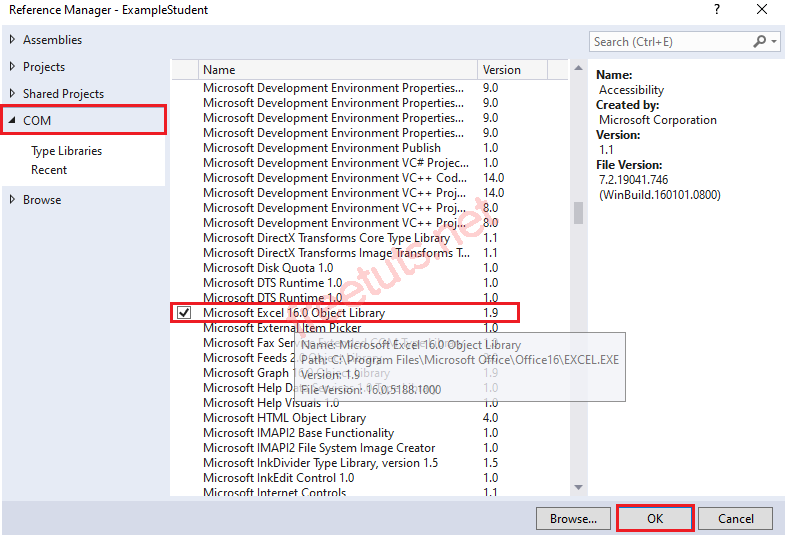
Như vậy là ta đã thêm thành công, bây giờ sẽ viết hàm ToExcel() để export dữ liệu từ DataGridView sang Excel. Hàm sẽ có hai tham số truyền vào đó là DataGridView và SaveFileDialog.
Ở đây, ta sử dụng hai vòng lặp for để in dữ liệu từ DataGridView sang Excel. Vòng lặp thứ nhất lặp từ 0 đến số cột, vòng lặp này để in tiêu đề (header text) của DataGridView. Vòng lặp thứ hai sẽ có hai vòng for, vòng for thứ nhất sẽ duyệt số cột và vòng for thứ hai duyệt số hàng. Cứ mỗi vòng lặp sẽ in từng giá trị trong DataGridView sang Excel.
Sau khi in xong thì sử dụng phương thức SaveAs() để lưu lại với tên là giá trị của thuộc tính FileName.
private void ToExcel(DataGridView dataGridView1, string fileName)
        {
            //khai báo thư viện hỗ trợ Microsoft.Office.Interop.Excel
            Microsoft.Office.Interop.Excel.Application excel;
            Microsoft.Office.Interop.Excel.Workbook workbook;
            Microsoft.Office.Interop.Excel.Worksheet worksheet;
            try
            {
                //Tạo đối tượng COM.
                excel = new Microsoft.Office.Interop.Excel.Application();
                excel.Visible = false;
                excel.DisplayAlerts = false;
                //tạo mới một Workbooks bằng phương thức add()
                workbook = excel.Workbooks.Add(Type.Missing);
                worksheet = (Microsoft.Office.Interop.Excel.Worksheet)workbook.Sheets["Sheet1"];
                //đặt tên cho sheet
                worksheet.Name = "Quản lý học sinh";

                // export header trong DataGridView
                for (int i = 0; i < dataGridView1.ColumnCount; i++)
                {
                    worksheet.Cells[1, i + 1] = dataGridView1.Columns[i].HeaderText;
                }
                // export nội dung trong DataGridView
                for (int i = 0; i < dataGridView1.RowCount; i++)
                {
                    for (int j = 0; j < dataGridView1.ColumnCount; j++)
                    {
                        worksheet.Cells[i + 2, j + 1] = dataGridView1.Rows[i].Cells[j].Value.ToString();
                    }
                }
                // sử dụng phương thức SaveAs() để lưu workbook với filename
                workbook.SaveAs(fileName);
                //đóng workbook
                workbook.Close();
                excel.Quit();
                MessageBox.Show("Xuất dữ liệu ra Excel thành công!");
            }
            catch (Exception ex)
            {
                MessageBox.Show(ex.Message);
            }
            finally
            {
                workbook = null;
                worksheet = null;
            }
        }
Sau đó gọi hàm ToExcel() ở sự kiện button_click của button "Export".
private void btnExport_Click(object sender, EventArgs e)
        {
            if (saveFileDialog1.ShowDialog() == DialogResult.OK)
            {
                //gọi hàm ToExcel() với tham số là dtgDSHS và filename từ SaveFileDialog
                ToExcel(dtgDiem, saveFileDialog1.FileName);
            }
        }
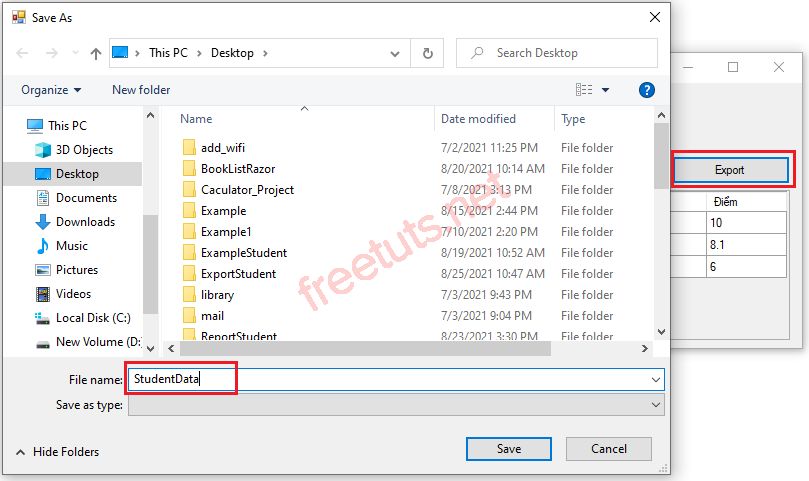
Khi người dùng nhấn vào button "Export", một cửa sổ mới xuất hiện yêu cầu người dùng nhập tên và chọn đường dẫn lưu file.
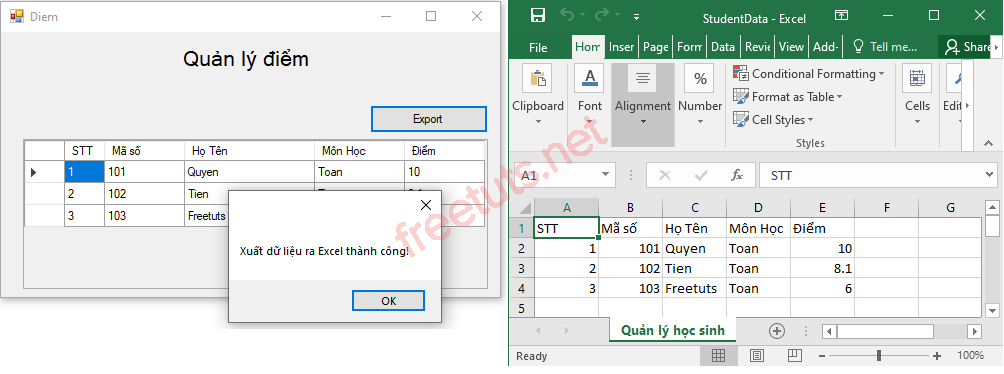
Kết quả: Sau khi chọn đường dẫn và lưu file, thì dữ liệu từ DataGridView sẽ được copy sang Excel.
5. Code hoàn chỉnh export dữ liệu trong C# Winforms
using System;
using System.Collections.Generic;
using System.ComponentModel;
using System.Configuration;
using System.Data;
using System.Data.SqlClient;
using System.Drawing;
using System.Linq;
using System.Text;
using System.Threading.Tasks;
using System.Windows.Forms;

namespace ExampleStudent
{
    public partial class Diem : Form
    {
        public Diem()
        {
            InitializeComponent();
        }

        private void Diem_Load(object sender, EventArgs e)
        {
            dtgDiem.Rows.Clear();
            SqlConnection conn = new SqlConnection();
            conn.ConnectionString = ConfigurationManager.ConnectionStrings["conStr"].ConnectionString;
            SqlCommand cmd = new SqlCommand("SP_LayDiem", conn);
            cmd.CommandType = CommandType.StoredProcedure;
            SqlDataReader dr;
            conn.Open();
            dr = cmd.ExecuteReader();
            int STT = 0;
            while (dr.Read())
            {
                STT = STT + 1;
                dtgDiem.Rows.Add(STT, dr.GetInt32(0), dr.GetString(1), dr.GetString(2), dr.GetDouble(3));

            }
            dr.Close();
        }

        private void btnExport_Click(object sender, EventArgs e)
        {
            if (saveFileDialog1.ShowDialog() == DialogResult.OK)
            {
                //gọi hàm ToExcel() với tham số là dtgDSHS và filename từ SaveFileDialog
                ToExcel(dtgDiem, saveFileDialog1.FileName);
            }
        }

        private void ToExcel(DataGridView dataGridView1, string fileName)
        {
            //khai báo thư viện hỗ trợ Microsoft.Office.Interop.Excel
            Microsoft.Office.Interop.Excel.Application excel;
            Microsoft.Office.Interop.Excel.Workbook workbook;
            Microsoft.Office.Interop.Excel.Worksheet worksheet;
            try
            {
                //Tạo đối tượng COM.
                excel = new Microsoft.Office.Interop.Excel.Application();
                excel.Visible = false;
                excel.DisplayAlerts = false;
                //tạo mới một Workbooks bằng phương thức add()
                workbook = excel.Workbooks.Add(Type.Missing);
                worksheet = (Microsoft.Office.Interop.Excel.Worksheet)workbook.Sheets["Sheet1"];
                //đặt tên cho sheet
                worksheet.Name = "Quản lý học sinh";

                // export header trong DataGridView
                for (int i = 0; i < dataGridView1.ColumnCount; i++)
                {
                    worksheet.Cells[1, i + 1] = dataGridView1.Columns[i].HeaderText;
                }
                // export nội dung trong DataGridView
                for (int i = 0; i < dataGridView1.RowCount; i++)
                {
                    for (int j = 0; j < dataGridView1.ColumnCount; j++)
                    {
                        worksheet.Cells[i + 2, j + 1] = dataGridView1.Rows[i].Cells[j].Value.ToString();
                    }
                }
                // sử dụng phương thức SaveAs() để lưu workbook với filename
                workbook.SaveAs(fileName);
                //đóng workbook
                workbook.Close();
                excel.Quit();
                MessageBox.Show("Xuất dữ liệu ra Excel thành công!");
            }
            catch (Exception ex)
            {
                MessageBox.Show(ex.Message);
            }
            finally
            {
                workbook = null;
                worksheet = null;
            }
        }
    }
}
Trên đây là cách export dữ liệu từ DataGridView sang Excel trong C# Winforms. Các bạn có thể xem các bài học và ví dụ về C# Winforms với CSDL SQL Server trong series Windows Form tại Freetuts.net.

 Các kiểu dữ liệu trong C ( int - float - double - char ...)
  Thuật toán tìm ước chung lớn nhất trong C/C++
  Cấu trúc lệnh switch case trong C++ (có bài tập thực hành)
  ComboBox - ListBox trong lập trình C# winforms
  Random trong Python: Tạo số random ngẫu nhiên
  Lệnh cin và cout trong C++
  Cách khai báo biến trong PHP, các loại biến thường gặp
  Download và cài đặt Vertrigo Server
  Thẻ li trong HTML
  Thẻ article trong HTML5
  Cấu trúc HTML5: Cách tạo template HTML5 đầu tiên
  Cách dùng thẻ img trong HTML và các thuộc tính của img
  Thẻ a trong HTML và các thuộc tính của thẻ a thường dùng

