 Các kiểu dữ liệu trong C ( int - float - double - char ...)
  Thuật toán tìm ước chung lớn nhất trong C/C++
  Cấu trúc lệnh switch case trong C++ (có bài tập thực hành)
  ComboBox - ListBox trong lập trình C# winforms
  Random trong Python: Tạo số random ngẫu nhiên
  Lệnh cin và cout trong C++
  Cách khai báo biến trong PHP, các loại biến thường gặp
  Download và cài đặt Vertrigo Server
  Thẻ li trong HTML
  Thẻ article trong HTML5
  Cấu trúc HTML5: Cách tạo template HTML5 đầu tiên
  Cách dùng thẻ img trong HTML và các thuộc tính của img
  Thẻ a trong HTML và các thuộc tính của thẻ a thường dùng
 Cách Update dữ liệu từ C# Winforms lên Firebase
Ở bài viết trước mình đã hướng dẫn các bạn cách Insert dữ liệu từ C# Winforms lên Firebase. Tương tự như vậy, trong bài viết này chúng ta sẽ tìm hiểu cách Update dữ liệu từ C# Winforms lên Firebase.

Cụ thể mình sẽ thực hiện Insert dữ liệu lên Firebase, sau đó lấy dữ liệu về và thực hiện chỉnh sửa rồi Update ngược lại Firebase.
Kết nối C# Winforms với Realtime Database
Để có thể thao tác được với dữ liệu trong Realtime Database, việc đầu tiên chúng ta cần kết nối tới nó. Mình có đoạn code kết nối như sau, các bạn có thể tìm hiểu kỹ hơn tại đây.
IFirebaseConfig config = new FirebaseConfig
{
      AuthSecret = "qe3MTNbKJkuPRyJMCB7adruK8QUT9eplAFx9L8fG",
      BasePath = "https://fir-connecting-2ffd6-default-rtdb.firebaseio.com/"
};

IFirebaseClient client;

private void Form1_Load(object sender, EventArgs e)
{
     client = new FireSharp.FirebaseClient(config);
}
Insert dữ liệu từ C# Winforms lên Realtime Database
Việc Insert dữ liệu từ C# Winforms lên Realtime Database bao gồm các bước sau.
Bài viết này được đăng tại [free tuts .net]
Bước 1: Tạo class với các biến tương ứng với các trường dữ liệu trên Realtime Database.
using System;
using System.Collections.Generic;
using System.Linq;
using System.Text;
using System.Threading.Tasks;

namespace ConnectingFirebase
{
    class Data
    {
        public string HoTen { get; set; }
        public string Lop { get; set; }
        public string Truong { get; set; }
    }
}
Bước 2: Xử lý sự kiện Click cho Button "Thêm".
private async void btnThem_Click(object sender, EventArgs e)
{
    if (txtHoTen.Text == "")
    {
        MessageBox.Show("Vui lòng nhập tên học sinh");
        txtHoTen.Focus();
    }
    else if (txtLop.Text == "")
    {
        MessageBox.Show("Vui lòng nhập lớp");
        txtLop.Focus();
    }
    else if (txtTruong.Text == "")
    {
        MessageBox.Show("Vui lòng nhập trường");
        txtTruong.Focus();
    }
    else
    {
        var data = new Data
        {
            HoTen = txtHoTen.Text,
            Lop = txtLop.Text,
            Truong = txtTruong.Text
        };

        SetResponse response = await client.SetTaskAsync("Information/", data);
        Data result = response.ResultAs<Data>();

        MessageBox.Show("Đã thêm mới thành công học sinh ");
        Reset();
        RetrieveData();
    }
}
Kết quả: Sai khi Insert dữ liệu lên Firebase sẽ có cấu trúc như sau.
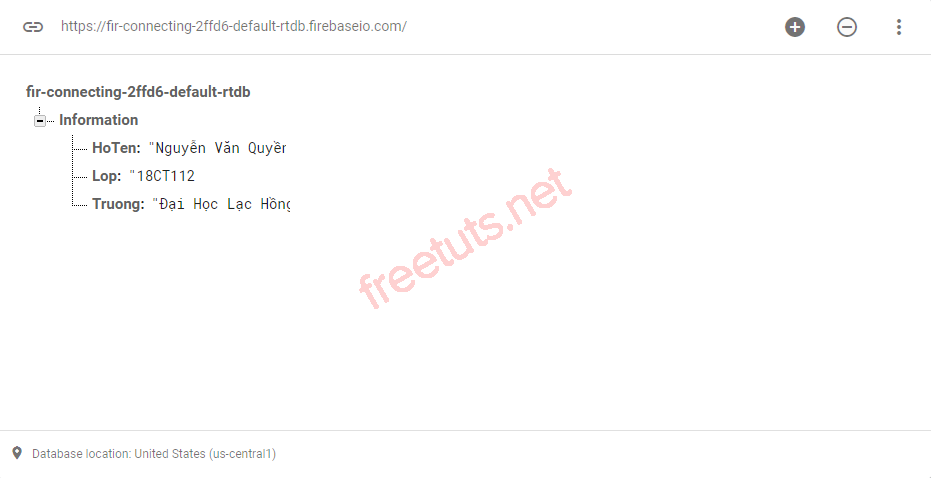
Lấy dữ liệu từ Firebase về C# Winforms
Sau khi Insert dữ liệu lên Realtime Database, chúng ta cần lấy dữ liệu về để kiểm tra. Ở đây mình sẽ tạo một hàm RetrieveData() để lấy dữ liệu về. Sở dĩ như vậy là vì khi chúng ta Insert hoặc Update sẽ gọi hàm này để load dữ liệu.
private async void RetrieveData()
{
dt.Rows.Clear();
FirebaseResponse resp2 = await client.GetTaskAsync("Information/");
Data obj2 = resp2.ResultAs<Data>();
DataRow row = dt.NewRow();
row["hoten"] = obj2.HoTen;
row["lop"] = obj2.Lop;
row["truong"] = obj2.Truong;
dt.Rows.Add(row);
}
private void btnRetrieve_Click(object sender, EventArgs e)
{
RetrieveData();
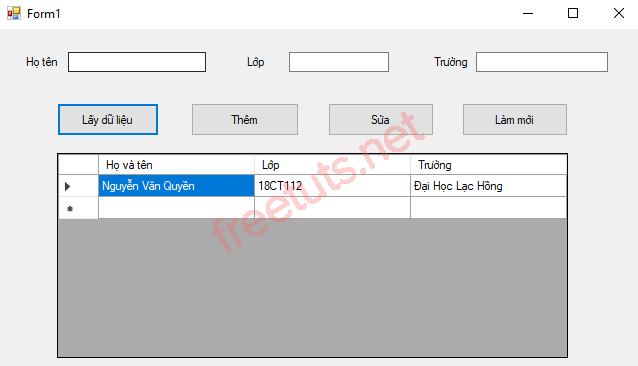
}Kết quả:
Update dữ liệu từ C# Winforms lên Realtime Database
Để thuận tiện cho việc Update dữ liệu, chúng ta cần sử lý cho sự kiện CellClick của DataGriView. Khi người dùng nhấn vào một ô bất kỳ thì dữ liệu của hàng đó sẽ hiển thị ngay trên TextBox, người dùng khỏi cần nhập lại.
private void dtgDSHS_CellClick(object sender, DataGridViewCellEventArgs e)
{
    DataGridViewRow row = new DataGridViewRow();
    row = dtgDSHS.Rows[e.RowIndex];
    txtHoTen.Text = Convert.ToString(row.Cells["hoten"].Value);
    txtLop.Text = Convert.ToString(row.Cells["lop"].Value);
    txtTruong.Text = Convert.ToString(row.Cells["truong"].Value);
}
Việc Update dữ liệu cũng được thực hiện tương tự như khi Insert dữ liệu. Chúng ta cần tạo mới một object data thuộc Class Data, với các giá trị chính là các ô TextBox.
Sau đó sử dụng phương thức UpdateTaskAsync() để cập nhật dữ liệu lên Realtime Database.
private async void btnSua_Click(object sender, EventArgs e)
{
if (txtHoTen.Text == "")
{
MessageBox.Show("Vui lòng nhập tên học sinh");
txtHoTen.Focus();
}
else if (txtLop.Text == "")
{
MessageBox.Show("Vui lòng nhập lớp");
txtLop.Focus();
}
else if (txtTruong.Text == "")
{
MessageBox.Show("Vui lòng nhập trường");
txtTruong.Focus();
}
else
{
var data = new Data
{
HoTen = txtHoTen.Text,
Lop = txtLop.Text,
Truong = txtTruong.Text
};
FirebaseResponse response = await client.UpdateTaskAsync("Information/", data);
Data result = response.ResultAs<Data>();
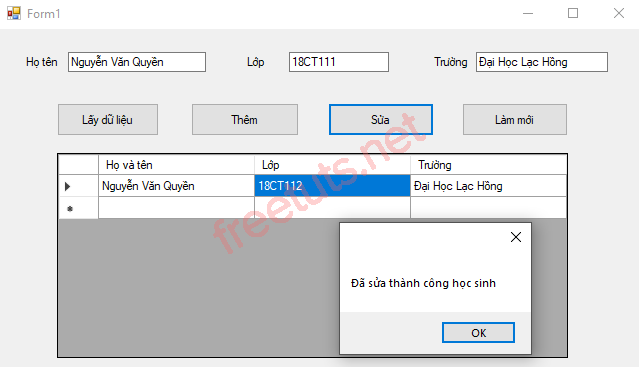
MessageBox.Show("Đã sửa thành công học sinh ");
Reset();
RetrieveData();
}
}Kết quả:
Code hoàn chỉnh
using System;
using System.Collections.Generic;
using System.ComponentModel;
using System.Data;
using System.Drawing;
using System.Linq;
using System.Text;
using System.Threading.Tasks;
using System.Windows.Forms;

using FireSharp.Config;
using FireSharp.Interfaces;
using FireSharp.Response;

namespace ConnectingFirebase
{
    public partial class Form1 : Form
    {
        DataTable dt = new DataTable();

        IFirebaseConfig config = new FirebaseConfig
        {
            AuthSecret = "qe3MTNbKJkuPRyJMCB7adruK8QUT9eplAFx9L8fG",
            BasePath = "https://fir-connecting-2ffd6-default-rtdb.firebaseio.com/"
        };

        IFirebaseClient client;

        public Form1()
        {
            InitializeComponent();
        }

        private void Form1_Load(object sender, EventArgs e)
        {
            client = new FireSharp.FirebaseClient(config);

            dt.Columns.Add("hoten");
            dt.Columns.Add("lop");
            dt.Columns.Add("truong");

            dtgDSHS.DataSource = dt;

            dtgDSHS.Columns[0].HeaderText = "Họ và tên";
            dtgDSHS.Columns[1].HeaderText = "Lớp";
            dtgDSHS.Columns[2].HeaderText = "Trường";
        }

        private async void RetrieveData()
        {
            dt.Rows.Clear();
            FirebaseResponse resp2 = await client.GetTaskAsync("Information/");
            Data obj2 = resp2.ResultAs<Data>();

            DataRow row = dt.NewRow();
            row["hoten"] = obj2.HoTen;
            row["lop"] = obj2.Lop;
            row["truong"] = obj2.Truong;

            dt.Rows.Add(row);
        }

        private void btnRetrieve_Click(object sender, EventArgs e)
        {
            RetrieveData();
        }

        void Reset()
        {
            txtHoTen.Clear();
            txtLop.Clear();
            txtTruong.Clear();
            txtHoTen.Focus();
        }

        private void btnReset_Click(object sender, EventArgs e)
        {
            Reset();
        }

        private async void btnThem_Click(object sender, EventArgs e)
        {
            if(txtHoTen.Text == "")
            {
                MessageBox.Show("Vui lòng nhập tên học sinh");
                txtHoTen.Focus();
            }
            else if(txtLop.Text == "")
            {
                MessageBox.Show("Vui lòng nhập lớp");
                txtLop.Focus();
            }
            else if (txtTruong.Text == "")
            {
                MessageBox.Show("Vui lòng nhập trường");
                txtTruong.Focus();
            }
            else
            {
                var data = new Data
                {
                    HoTen = txtHoTen.Text,
                    Lop = txtLop.Text,
                    Truong = txtTruong.Text
                };

                SetResponse response = await client.SetTaskAsync("Information/", data);
                Data result = response.ResultAs<Data>();

                MessageBox.Show("Đã thêm mới thành công học sinh ");
                Reset();
                RetrieveData();
            }
        }

        private async void btnSua_Click(object sender, EventArgs e)
        {
            if (txtHoTen.Text == "")
            {
                MessageBox.Show("Vui lòng nhập tên học sinh");
                txtHoTen.Focus();
            }
            else if (txtLop.Text == "")
            {
                MessageBox.Show("Vui lòng nhập lớp");
                txtLop.Focus();
            }
            else if (txtTruong.Text == "")
            {
                MessageBox.Show("Vui lòng nhập trường");
                txtTruong.Focus();
            }
            else
            {
                var data = new Data
                {
                    HoTen = txtHoTen.Text,
                    Lop = txtLop.Text,
                    Truong = txtTruong.Text
                };

                FirebaseResponse response = await client.UpdateTaskAsync("Information/", data);
                Data result = response.ResultAs<Data>();

                MessageBox.Show("Đã sửa thành công học sinh ");
                Reset();
                RetrieveData();
            }
        }

        private void dtgDSHS_CellClick(object sender, DataGridViewCellEventArgs e)
        {
            DataGridViewRow row = new DataGridViewRow();
            row = dtgDSHS.Rows[e.RowIndex];
            txtHoTen.Text = Convert.ToString(row.Cells["hoten"].Value);
            txtLop.Text = Convert.ToString(row.Cells["lop"].Value);
            txtTruong.Text = Convert.ToString(row.Cells["truong"].Value);
        }
    }
}
Như vậy là chúng ta đã tìm hiểu xong cách Update dữ liệu từ C# Winforms lên Firebase. Cũng như ôn lại các kiến thức về cách kết nối, lấy dữ liệu và Insert dữ liệu lên Firebase. Ở bài tiếp theo mình sẽ tiếp tục thực hiện chức năng xóa dữ liệu trên Firebase.