 Image trong React Native
  Cấu trúc thư mục Project Android
  Cách khai báo biến trong PHP, các loại biến thường gặp
  Download và cài đặt Vertrigo Server
  Thẻ li trong HTML
  Thẻ article trong HTML5
  Cấu trúc HTML5: Cách tạo template HTML5 đầu tiên
  Cách dùng thẻ img trong HTML và các thuộc tính của img
  Thẻ a trong HTML và các thuộc tính của thẻ a thường dùng
 Explicit Intents trong Android
Trong bài này chúng ta sẽ tìm hiểu một loại Intent mới trong Android đó là Explicit Intent. Công dụng của Explicit Intent là giúp gửi thông tin giữa các Activity.

Explicit intent trong Android còn được gọi là Intent tường minh vì nó chỉ rõ component sẽ nhận và xử lý. Thông thường những intent này sẽ không cần gán bổ sung thêm các thuộc tính khác như action, data.
1. Explicit Intent trong Android là gì?
Trong Android, Explicit intents xác định rõ ràng tên của component sẽ được gọi bởi activity. Explicit intent thường được sử dụng để khởi chạy các component trong cùng một ứng dụng.
Ví dụ: bằng cách sử dụng explicit intent, chúng ta có thể khởi chạy một activity mới để đáp lại hành động của người dùng.
Bài viết này được đăng tại [free tuts .net]
Bằng cách sử dụng explicit intent, ta có thể gửi hoặc chia sẻ dữ liệu / nội dung từ activity này sang activity khác. Để tạo một Explicit Intent, chúng ta cần xác định tên component cho Intent.
Sau đây là đoạn code minh họa về explicit intent trong ứng dụng Android.
Intent di = new Intent(this, ActivityView.class);
di.setData(Uri.parse("http://www.tutlane.com"));
startService(di);
Theo ví dụ trên, chúng ta xác định context (this) và external ( ActivityView.class), sau đó intent sẽ khởi chạy lớp ActivityView trong ứng dụng.
2. Ví dụ về Explicit Intent trong Android
Sau đây chúng ta sẽ đi vào ví dụ về một Explicit Intent trong ứng dụng Android để các bạn hiểu rõ hơn về loại Intent này. Ở đây chúng ta sẽ thực hiện phép cộng hai số trong activity và gửi kết quả đến activity khác để hiển thị.
Tạo một ứng dụng Android mới và mở file activity_main.xml từ đường dẫn \ src \ main \ res \ layout.
activity_main.xml
<?xml version="1.0" encoding="utf-8"?>
<LinearLayout xmlns:android="http://schemas.android.com/apk/res/android"
    android:orientation="vertical" android:layout_width="match_parent"
    android:layout_height="match_parent">
    <TextView
        android:id="@+id/fstTxt"
        android:layout_width="wrap_content"
        android:layout_height="wrap_content"
        android:layout_marginLeft="100dp"
        android:layout_marginTop="150dp"
        android:text="First Number"
         />
    <EditText
        android:id="@+id/firstNum"
        android:layout_width="wrap_content"
        android:layout_height="wrap_content"
        android:layout_marginLeft="100dp"
        android:ems="10">
    </EditText>
    <TextView
        android:id="@+id/secTxt"
        android:layout_width="wrap_content"
        android:layout_height="wrap_content"
        android:text="Second Number"
        android:layout_marginLeft="100dp"
         />
    <EditText
        android:id="@+id/secondNum"
        android:layout_width="wrap_content"
        android:layout_height="wrap_content"
        android:layout_marginLeft="100dp"
        android:ems="10" />
    <Button
        android:id="@+id/addBtn"
        android:layout_width="wrap_content"
        android:layout_height="wrap_content"
        android:layout_marginLeft="100dp"
        android:text="Add" />
</LinearLayout>
Tiếp theo, ta tạo một layout resource file result.xml trong đường dẫn \ src \ main \ res \ layout để lấy kết quả cộng trong activity đầu (activity_main.xml) bằng cách kích chuột phải vào thư mục ứng dụng -> New -> Layout Resource File và đặt tên là result.xml.
Khi tạo xong, mở và viết code như như dưới đây
result.xml
<?xml version="1.0" encoding="utf-8"?>
<LinearLayout xmlns:android="http://schemas.android.com/apk/res/android"
    android:orientation="vertical" android:layout_width="match_parent"
    android:layout_height="match_parent">
<TextView
    android:layout_width="wrap_content"
    android:layout_height="wrap_content"
    android:id="@+id/resultView"
    android:layout_marginLeft="100dp"
    android:layout_marginTop="150dp"/>
</LinearLayout>
Tiếp theo, mở file MainActivity.java từ đường dẫn \ src \ main \ java \ com.tutlane.intents và viết code như dưới đây
MainActivity.java
package com.tutlane.intents;

import android.content.Intent;
import android.support.v7.app.AppCompatActivity;
import android.os.Bundle;
import android.view.View;
import android.widget.Button;
import android.widget.EditText;

public class MainActivity extends AppCompatActivity {

    @Override
    protected void onCreate(Bundle savedInstanceState) {
        super.onCreate(savedInstanceState);
        setContentView(R.layout.activity_main);
        final EditText firstNum = (EditText)findViewById(R.id.firstNum);
        final EditText secNum = (EditText)findViewById(R.id.secondNum);
        Button btnAdd = (Button)findViewById(R.id.addBtn);
        btnAdd.setOnClickListener(new View.OnClickListener() {
            @Override
            public void onClick(View v) {
                int num1 = Integer.parseInt(firstNum.getText().toString());
                int num2 = Integer.parseInt(secNum.getText().toString());
                Intent intent = new Intent(MainActivity.this,ResultActivity.class);
                intent.putExtra("SUM",num1+" + "+num2+" = "+(num1+num2));
                startActivity(intent);
            }
        });
    }
}
Ta sẽ tạo thêm một file activity khác tên là ResultActivity.java trong đường dẫn \ src \ main \ java \ com.tutlane.intents để lấy kết quả cộng của activity đầu tiên ( MainActivity.java ) bằng cách cho kích chuột phải vào thư mục ứng dụng -> New -> Java Class và đặt tên là ResultActivity.java.
Sau đó, viết code như dưới đây vào file ResultActivity.java
ResultActivity.java
package com.tutlane.intents;

import android.content.Intent;
import android.os.Bundle;
import android.support.v7.app.AppCompatActivity;
import android.widget.TextView;

/**
 * Created by surdasari on 27-07-2017.
 */

public class ResultActivity  extends AppCompatActivity {
    @Override
    protected void onCreate(Bundle savedInstanceState) {
        super.onCreate(savedInstanceState);
        setContentView(R.layout.result);
        TextView result = (TextView)findViewById(R.id.resultView);
        Intent intent = getIntent();
        String addition = (String)intent.getSerializableExtra("SUM");
        result.setText(addition);
    }
}
Tiếp theo, cần thêm activity mới được tạo này vào file ActivityManifest.xml bằng cách nhập code sau vào file
ActivityMainfest.xml
<?xml version="1.0" encoding="utf-8"?>
<manifest xmlns:android="http://schemas.android.com/apk/res/android"
    package="com.tutlane.intents">
    <application
        android:allowBackup="true"
        android:icon="@mipmap/ic_launcher"
        android:label="Explicit Intent - Activity1"
        android:roundIcon="@mipmap/ic_launcher_round"
        android:supportsRtl="true"
        android:theme="@style/AppTheme">
        <activity android:name=".MainActivity">
            <intent-filter>
                <action android:name="android.intent.action.MAIN" />
                <category android:name="android.intent.category.LAUNCHER" />
            </intent-filter>
        </activity>
        <activity android:name=".ResultActivity" android:label="Explicit Intent - Activity2">
        </activity>
    </application>
</manifest>
Ở phía trên đây là chúng ta đang thực hiện phép tính cộng trong một activity ( MainActivity.java ) và gửi thông tin kết quả đó đến một activity khác ( ResultActivity.java ) và thêm tất cả các activity vào file AndroidManifest.xml .
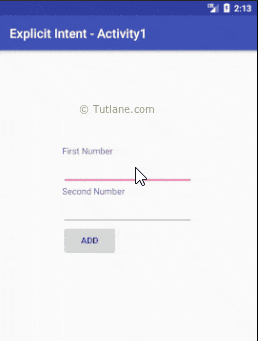
3. Kết quả của ví dụ về Explicit Intent trong Android
Khi chạy ví dụ trên trong trình giả lập Android, ta sẽ nhận được kết quả như hiển thị bên dưới
Đây là cách sử dụng Explicit Intent để gửi thông tin từ activity này sang activity khác trong ứng dụng Android.