 Các hàm xử lý chuỗi trong Javascript (cắt / tách / nối chuỗi ..)
  Chia lấy phần dư / chia lấy phần nguyên trong javascript
  Các cách khai báo biến trong Javascript
  Các sự kiện (Event) trong Javascript
 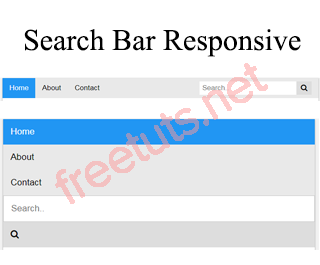 Hướng tạo thanh search bar bằng CSS
  Hàm array.slice() trong Javascript
  Tính tổng hai số bằng Javascript (cộng hai số)
  Cách khai báo biến trong PHP, các loại biến thường gặp
  Download và cài đặt Vertrigo Server
  Thẻ li trong HTML
  Thẻ article trong HTML5
  Cấu trúc HTML5: Cách tạo template HTML5 đầu tiên
  Cách dùng thẻ img trong HTML và các thuộc tính của img
  Thẻ a trong HTML và các thuộc tính của thẻ a thường dùng
 Ứng dụng single page Angular 4
Trong phần này chúng ta sẽ tổng hợp các kiến thức đã được học trong toàn bộ series này để tạo thành một ứng dụng single page nho nhỏ: có các thành phần header, footer cố định; 2 view : view login và view thông tin bạn đọc Freetuts. Ở view login nếu nhập đúng thông tin username và password thì user sẽ được chuyển đến view thông tin bạn đọc Freetuts.

Ứng dụng của chúng ta sau khi hoàn thiện sẽ nhìn như sau
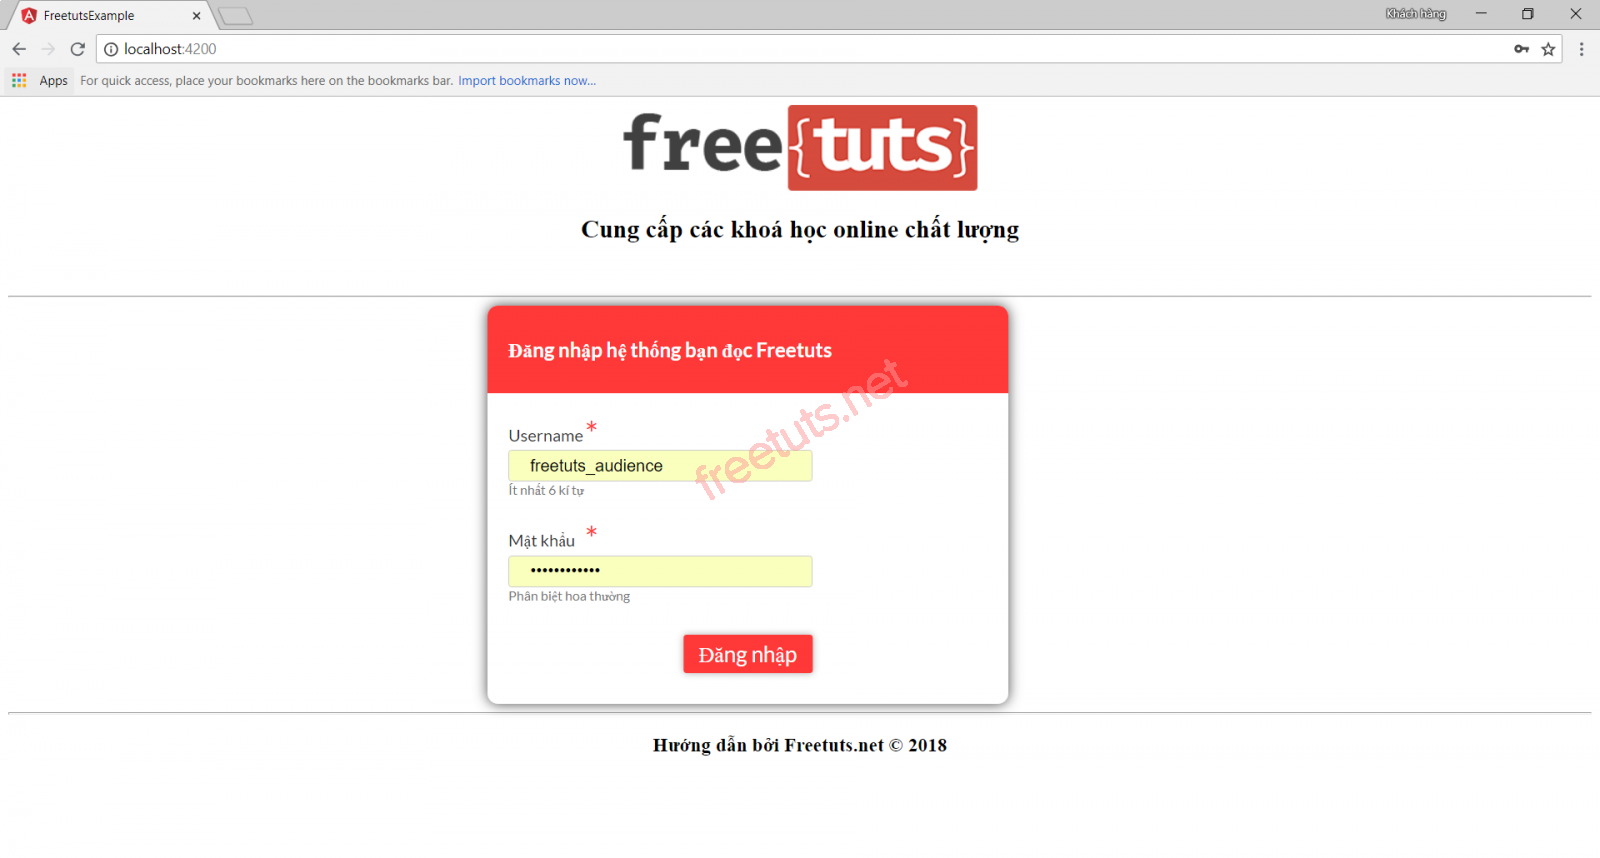
Giao diện đăng nhập:
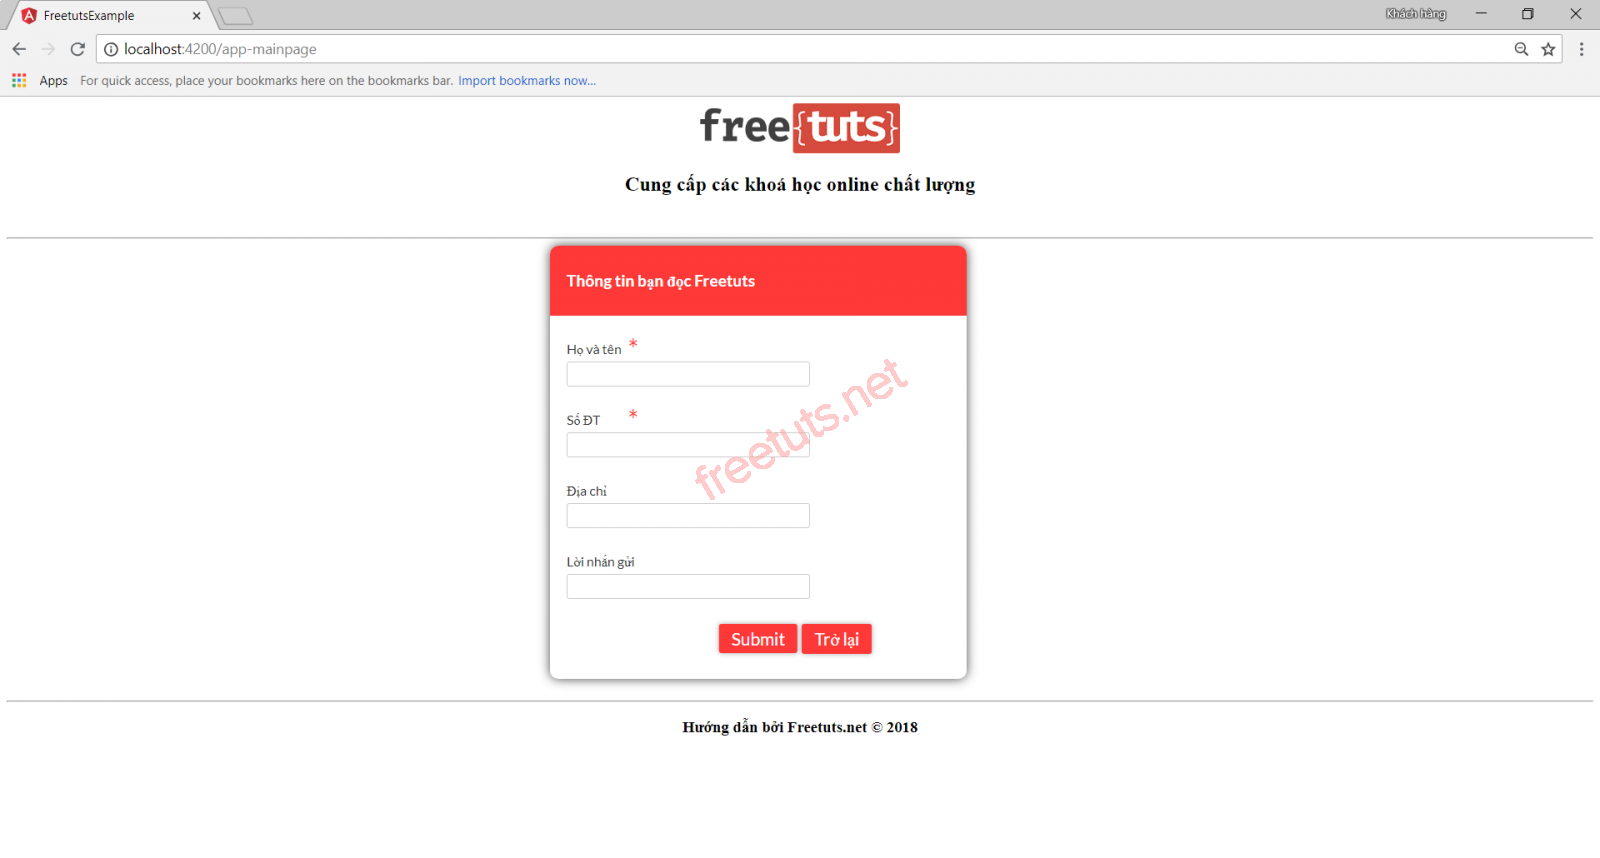
Giao diện thông tin bạn đọc
Bài viết này được đăng tại [free tuts .net]
Ok. Ý tưởng là như vậy. Chúng ta cùng bắt tay vào làm nhé.
Phân tích giao diện
Giao diện của chúng ta có 3 phần chính: phần header, phần view chính và phần footer.
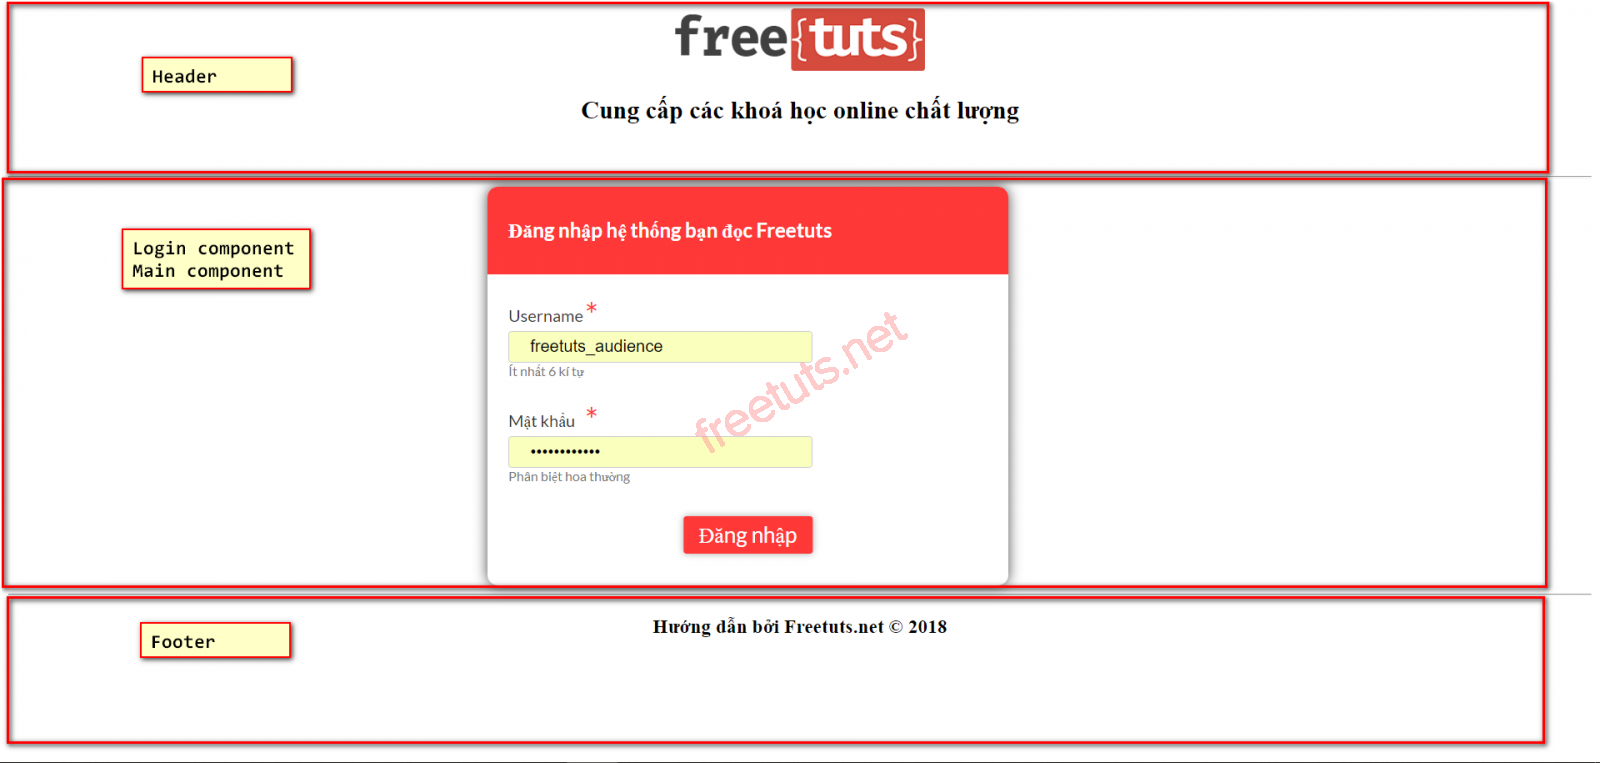
Header, footer, view login, view bạn đọc là các component mà ta đã được học trong bài Component trong Angular 4.
Header và footer là các thành phần cố định, chỉ có phần view chính sẽ thay đổi tuỳ thuộc vào router. Như vậy ta cần sử dụng kiến thức về router đã được học trong bài Router trong angular 4. Bạn nào quên có thể click vào đây để xem lại nhé.
Trong view login và view bạn đọc đều có các form. Trong các form này, ta sử dụng kĩ thuật Form validate đã được học trong các bài trước.
Như vậy là trong một ví dụ trên, chúng ta nhớ lại và xâu chuỗi được khá nhiều kiến thức: Component, router, form.
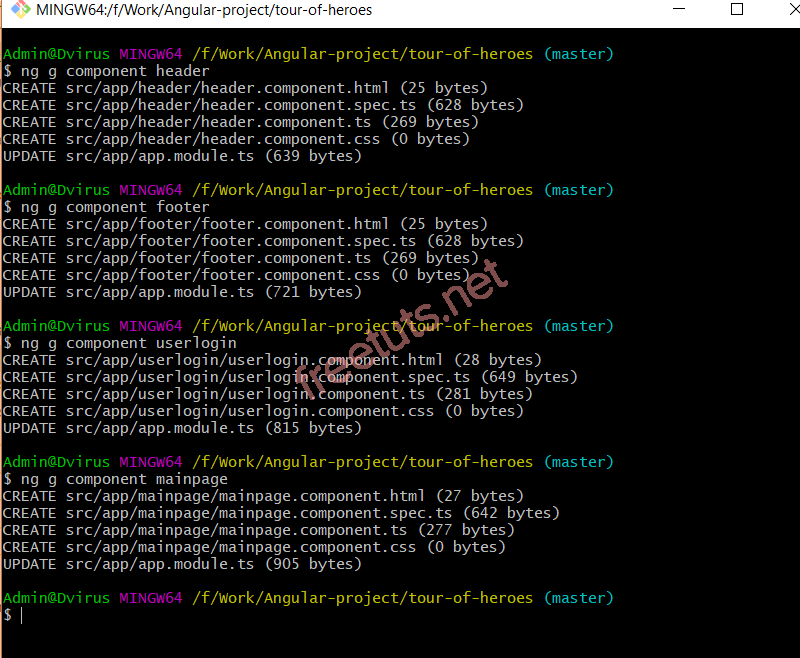
Tạo các component
Để tạo các component, ta lần lượt chạy các lệnh
ng g component header
ng g component footer
ng g component userlogin
ng g component mainpage
Sau khi chạy xong các lệnh trên hoàn thành, màn hình command line trông như sau
Mở file app.module.ts ra, ta thấy các component đã được import vào tự động
import { BrowserModule } from '@angular/platform-browser';
import { NgModule } from '@angular/core';

import { AppComponent } from './app.component';
import { HeaderComponent } from './header/header.component';
import { FooterComponent } from './footer/footer.component';
import { UserloginComponent } from './userlogin/userlogin.component';
import { MainpageComponent } from './mainpage/mainpage.component';

import { ReactiveFormsModule } from '@angular/forms';
import { RouterModule, Routes} from '@angular/router';
import { BrowserAnimationsModule } from '@angular/platform-browser/animations';
import {MatTableModule, MatInputModule} from '@angular/material';
import {HttpModule} from "@angular/http";

const appRoutes: Routes = [
  {
     path: '',
     component: UserloginComponent
  },
  {
     path: 'app-mainpage',
     component: MainpageComponent
  }
];

@NgModule({
  declarations: [
    AppComponent,
    HeaderComponent,
    FooterComponent,
    UserloginComponent,
    MainpageComponent
  ],
  imports: [
    BrowserModule,
      ReactiveFormsModule,
      RouterModule.forRoot(appRoutes),
      BrowserAnimationsModule,
      HttpModule,
      MatTableModule,
      MatInputModule
  ],
  providers: [],
  bootstrap: [AppComponent]
})
export class AppModule { }
Ở file app.component.html, ta chỉnh sửa nội dung như sau
<div class="mainpage">
<app-header></app-header>
<router-outlet></router-outlet>
<app-footer></app-footer>
</div>
Ở đây, ta đã sử dụng 2 component header và footer thông qua selector của các component này và sử dụng thẻ <router-outlet> để định nghĩa vị trí mà view trong router cấu hình sẽ hiển thị ra.
Tạo giao diện cho header, footer
Ở file header.component.html, chúng ta thêm nội dung
<div style="margin-bottom: 50px;  text-align: center;">
    <img style="width: 240px; height: 60px;" src="https://freetuts.net/public/logo/hoc-lap-trinh-online.png" width="100" height="100">
    <h2>Cung cấp các khoá học online chất lượng</h2>
</div>
<hr/>
Tương tự với file footer.component.html
<hr/> <h3 style="text-align: center;">Hướng dẫn bởi Freetuts.net © 2018</h3>
Tạo giao diện "login"
Tại giao userlogin component, ta thêm vào nội dung cho file userlogin.component.html
<div class="form_container">
  <form [formGroup]="formdata" (ngSubmit) = "onClickSubmit(formdata.value)" >
     <header>Đăng nhập hệ thống bạn đọc Freetuts</header>
     <label>Username <span>*</span></label>
     <input type="text" name="uname" formControlName="uname"/>

     <div class="help">Ít nhất 6 kí tự</div>
     <label>Mật khẩu <span>*</span></label>
     <input type="password" class="fortextbox" name="passwd" formControlName="passwd"/>

     <div class="help">Phân biệt hoa thường</div>
     <button [disabled]="!formdata.valid" value="Login">Đăng nhập</button>
  </form>
</div>
Ở file userlogin.component.ts, ta thêm code xử lý
import { Component, OnInit } from '@angular/core';
import { FormGroup, FormControl, Validators} from '@angular/forms';
import { Router} from '@angular/router';

@Component({
   selector: 'app-userlogin',
   templateUrl: './userlogin.component.html',
   styleUrls: ['./userlogin.component.css']
})

export class UserloginComponent implements OnInit {
   formdata;
   constructor(private router: Router) { }
   ngOnInit() {
      this.formdata = new FormGroup({
         uname: new FormControl("", Validators.compose([
            Validators.required,
            Validators.minLength(6)
         ])),
         passwd: new FormControl("", this.passwordvalidation)
      });
   }
   passwordvalidation(formcontrol) {
      if (formcontrol.value.length < 5) {
         return {"passwd" : true};
      }
   }
   onClickSubmit(data) {
      console.log(data.uname);
      if (data.uname == "freetuts_audience" && data.passwd == "freetuts.net") {
         alert("Login Successful");
         this.router.navigate(['app-mainpage'])
      }
   }
}
Ở đây, ta định nghĩa khi login với username là freetuts_audience và password là freetuts.net thì thông báo đăng nhập thành công và chuyển tới url là app-mainpage.
Thêm 1 chút css trong file userlogin.component.css để hiển thị bắt mắt hơn
.form_container{
margin : 0 auto;
width:600px;
}
form {
background: white;
width: 500px;
box-shadow: 0px 0px 20px rgba(0, 0, 0, 0.7);
font-family: lato;
position: relative;
color: #333;
border-radius: 10px;
}
form header {
background: #FF3838;
padding: 30px 20px;
color: white;
font-size: 1.2em;
font-weight: 600;
border-radius: 10px 10px 0 0;
}
form label {
margin-left: 20px;
display: inline-block;
margin-top: 30px;
margin-bottom: 5px;
position: relative;
}
form label span {
color: #FF3838;
font-size: 2em;
position: absolute;
left: 2.3em;
top: -10px;
}
form input {
display: block;
width: 50%;
margin-left: 20px;
padding: 5px 20px;
font-size: 1em;
border-radius: 3px;
outline: none;
border: 1px solid #ccc;
}
form .help {
margin-left: 20px;
font-size: 0.8em;
color: #777;
}
form button {
position: relative;
margin-top: 30px;
margin-bottom: 30px;
left: 50%;
transform: translate(-50%, 0);
font-family: inherit;
color: white;
background: #FF3838;
outline: none;
border: none;
padding: 5px 15px;
font-size: 1.3em;
font-weight: 400;
border-radius: 3px;
box-shadow: 0px 0px 10px rgba(51, 51, 51, 0.4);
cursor: pointer;
transition: all 0.15s ease-in-out;
}
form button:hover {
background: #ff5252;
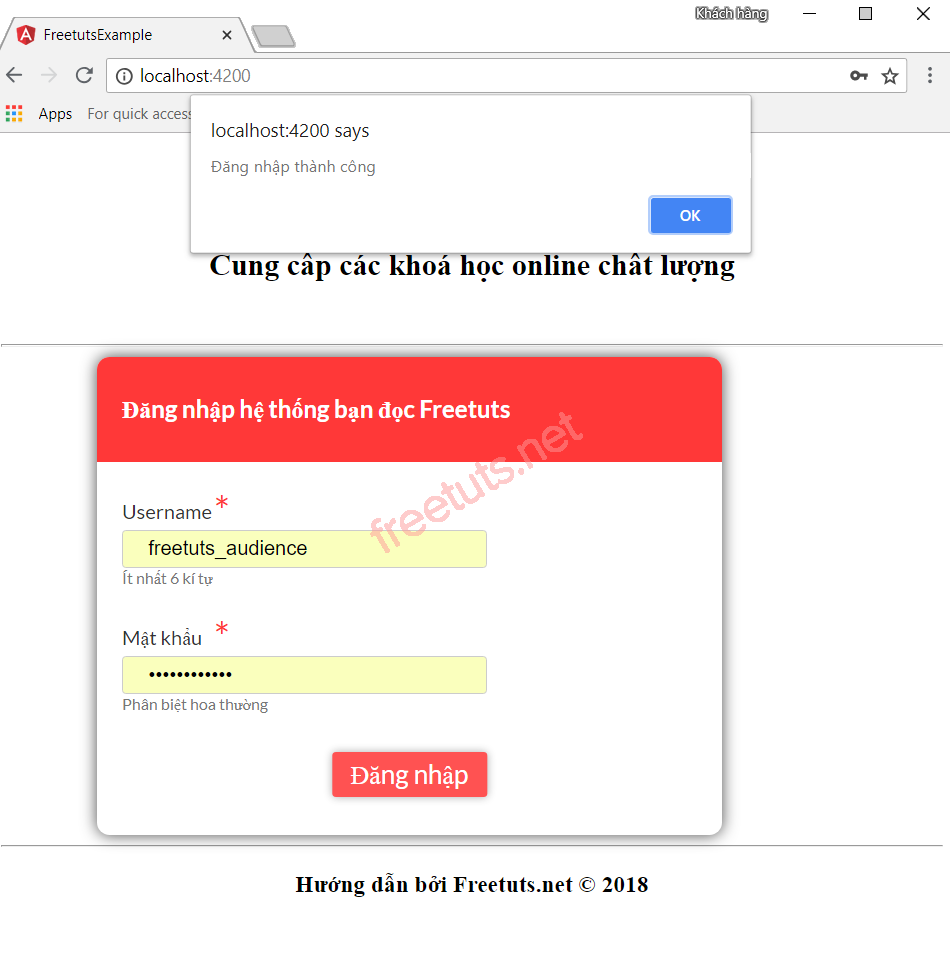
}Cùng chạy thử và login với user là freetuts_audience, ta nhận được thông báo đăng nhập thành công như hình dưới
Tạo giao diện "bạn đọc freetuts"
Mở file mainpage.component.html ra và thay đổi nội dung thành
<div class="form_container">
  <form [formGroup]="formdata" (ngSubmit)="onClickSubmit(formdata.value)">
    <header>Thông tin bạn đọc Freetuts</header>
    <label>Họ và tên
      <span>*</span>
    </label>
    <input type="text" name="name" formControlName="name" />
    <label>Số ĐT
      <span>*</span>
    </label>
    <input type="text" name="phone" formControlName="phone" />
    <label>Địa chỉ
      <span></span>
    </label>
    <input type="text" name="address" formControlName="address" />
    <label>Lời nhắn gửi
      <span></span>
    </label>
    <input type="text" name="message" formControlName="message" />
    <button [disabled]="!formdata.valid" value="Submit">Submit</button>
    <button routerLink = "">Trở lại</button>
  </form>
</div>
<br/>
<div id="custtable" style="display:none;margin:0 auto;">
  <table>
    <thead>
      <tr>
        <th>Họ và tên</th>
        <th>SDT</th>
        <th>Địa chỉ</th>
        <th>Lời nhắn gửi</th>
      </tr>
    </thead>
    <tbody>
      <tr *ngFor="let item of cutomerdata">
        <td>{{item.name}}</td>
        <td>{{item.phone}}</td>
        <td>{{item.address}}</td>
        <td>{{item.message}}</td>
      </tr>
    </tbody>
  </table>
</div>
Tiếp đó đến file mainpage.component.ts
import { Component, OnInit, ViewChild} from '@angular/core';
import { FormGroup, FormControl, Validators} from '@angular/forms';

import {Http, Response, Headers, RequestOptions } from "@angular/http";

@Component({
   selector: 'app-mainpage',
   templateUrl: './mainpage.component.html',
   styleUrls: ['./mainpage.component.css']
})

export class MainpageComponent implements OnInit {
   formdata;
   cutomerdata = [];
   constructor(private http: Http) { }
   stateCtrl: FormControl;
   ngOnInit() {
      this.formdata = new FormGroup({
         name: new FormControl("", Validators.compose([
            Validators.required,
            Validators.minLength(3)
         ])),
         phone: new FormControl("", Validators.compose([
            Validators.required,
            Validators.minLength(3)
         ])),
         address:new FormControl(""),
         message:new FormControl("")
      });
   }
   onClickSubmit(data) {
      document.getElementById("custtable").style.display="";
      var row = {
          "name" : data.name,
          "phone" : data.phone,
          "address" : data.address,
          "message" : data.message
      };

      this.cutomerdata.push(row);
      console.log(this.cutomerdata);
   }
}
Sửa nội dung mainpage.component.css cho giao diện bắt mắt hơn
.form_container{
margin : 0 auto;
width:600px;
}
form {
background: white;
width: 500px;
box-shadow: 0px 0px 20px rgba(0, 0, 0, 0.7);
font-family: lato;
position: relative;
color: #333;
border-radius: 10px;
}
form header {
background: #FF3838;
padding: 30px 20px;
color: white;
font-size: 1.2em;
font-weight: 600;
border-radius: 10px 10px 0 0;
}
form label {
margin-left: 20px;
display: inline-block;
margin-top: 30px;
margin-bottom: 5px;
position: relative;
}
form label span {
color: #FF3838;
font-size: 2em;
position: absolute;
left: 2.3em;
top: -10px;
}
form input {
display: block;
width: 50%;
margin-left: 20px;
padding: 5px 20px;
font-size: 1em;
border-radius: 3px;
outline: none;
border: 1px solid #ccc;
}
form .help {
margin-left: 20px;
font-size: 0.8em;
color: #777;
}
form button {
position: relative;
margin-top: 30px;
margin-bottom: 30px;
left: 50%;
transform: translate(-50%, 0);
font-family: inherit;
color: white;
background: #FF3838;
outline: none;
border: none;
padding: 5px 15px;
font-size: 1.3em;
font-weight: 400;
border-radius: 3px;
box-shadow: 0px 0px 10px rgba(51, 51, 51, 0.4);
cursor: pointer;
transition: all 0.15s ease-in-out;
}
form button:hover {
background: #ff5252;
}
td,
th{
border: 1px solid black;
padding: 15px;
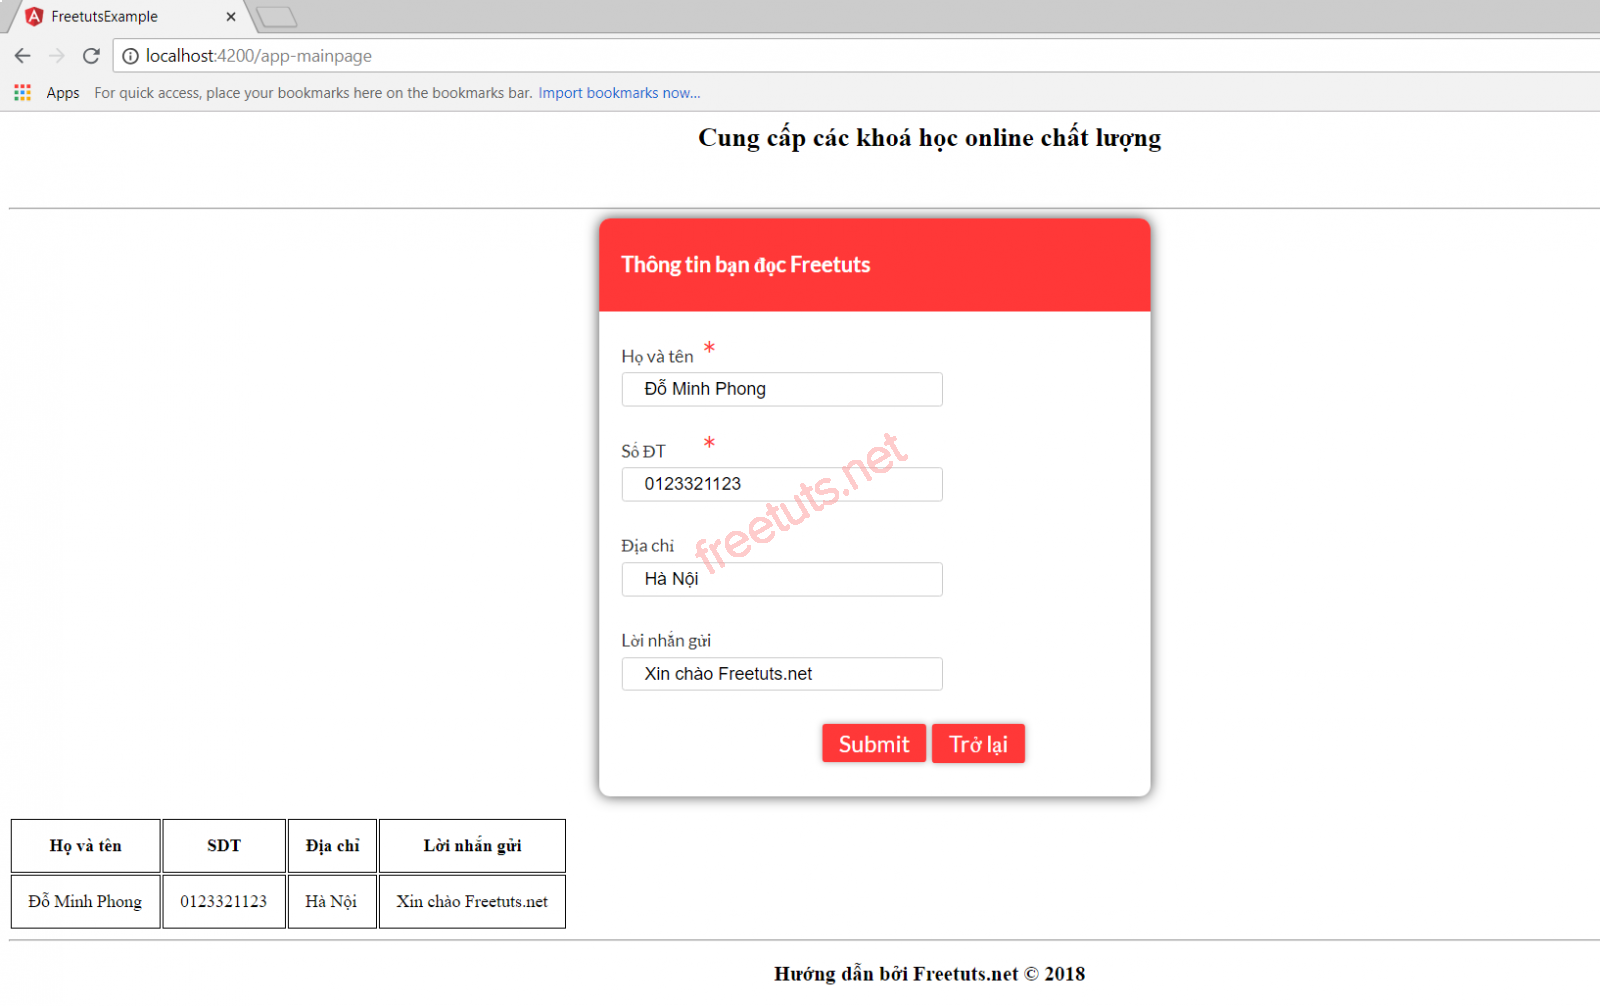
}Ok. Sau khi hoàn thành, chúng ta cùng kiểm tra thì thấy như hình dưới
Đến đây thì ứng dụng của chúng ta đã hoàn thành rồi. Bài này có lẽ là bài cuối trong series Angular 4 rồi. Có gì khó khăn hay bị lỗi thì bạn hãy đặt câu hỏi để được hỗ trợ.
Hẹn gặp lại các bạn trong các series Angular 4 khác nhé :)
Danh sách file tải về
| Tên file tải về | Pass giải nén |
|---|---|
| Tải source code | freetuts.net hoặc gameportable.net |